How to detect motion with a PIR sensor and ESP8266?
Are you looking to build a motion-sensing project using a PIR (Passive Infrared) sensor and an ESP8266? Look no further! In this article, we will guide you through the process of detecting motion with a PIR sensor and ESP8266.
Before we dive into the nitty-gritty details, let’s first understand what a PIR sensor and ESP8266 are.
What is a PIR sensor?
A PIR sensor is a type of electronic sensor that measures infrared (IR) light radiating from objects within its field of view. When an object moves within the sensor’s range, the sensor detects the change in IR radiation and triggers an output signal. PIR sensors are commonly used in motion-activated lighting systems, security alarms, and other applications requiring motion detection.
What is an ESP8266?
The ESP8266 is a popular Wi-Fi microcontroller module that allows you to connect your projects to the internet wirelessly. It is widely used in IoT (Internet of Things) applications, home automation, and more. The ESP8266 is known for its low cost, low power consumption, and ease of use, making it an ideal choice for building projects that require internet connectivity.
How to interface a PIR sensor with ESP8266?
Interfacing a PIR sensor with an ESP8266 is a relatively simple process. You will need the following components:
- PIR sensor
- ESP8266 module
- Jumper wires
- Breadboard
- USB cable for programming
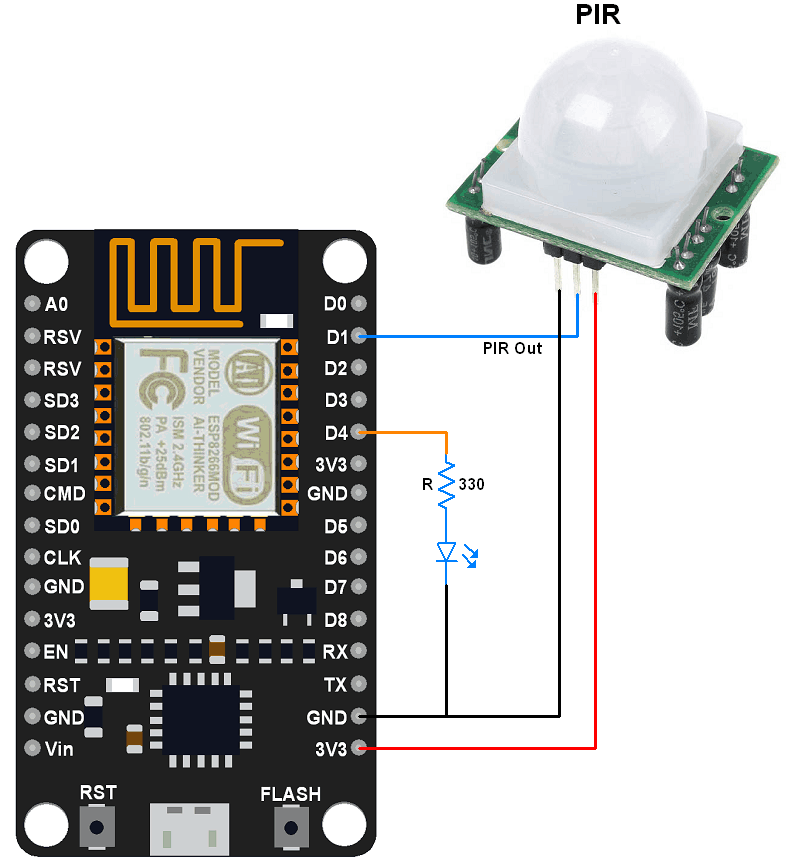
Connect the PIR sensor to the ESP8266 as follows:
- VCC of PIR sensor to 3.3V on ESP8266
- GND of PIR sensor to GND on ESP8266
- Signal output of PIR sensor to any digital pin on ESP8266 (e.g., D1)
Once you have connected the PIR sensor to the ESP8266, you can begin writing the code to detect motion using the sensor.
Writing the code to detect motion
Below is a sample code snippet in Arduino IDE that demonstrates how to detect motion using a PIR sensor with an ESP8266:
void setup() {
   pinMode(D1, INPUT);
   Serial.begin(9600);
}

void loop() {
   if(digitalRead(D1) == HIGH){
       Serial.println("Motion detected!");
       delay(1000);
   }
}
In this code snippet, we first set the pinMode of the digital pin connected to the PIR sensor as INPUT in the setup function. In the loop function, we constantly check the state of the digital pin, and if it is HIGH (indicating motion detection), we print “Motion detected!” to the serial monitor.
Conclusion
With the above guide, you can now easily detect motion using a PIR sensor and ESP8266. Feel free to expand upon this project by adding more functionality, such as sending notifications or controlling other devices based on motion detection. The possibilities are endless!
We hope this article has been helpful in getting you started with your motion-sensing project. Happy tinkering!
How to detect motion with a PIR sensor and ESP8266?
Are you looking to build a motion-sensing project using a PIR (Passive Infrared) sensor and an ESP8266? Look no further! In this article, we will guide you through the process of detecting motion with a PIR sensor and ESP8266.
Before we dive into the nitty-gritty details, let’s first understand what a PIR sensor and ESP8266 are.
What is a PIR sensor?
A PIR sensor is a type of electronic sensor that measures infrared (IR) light radiating from objects within its field of view. When an object moves within the sensor’s range, the sensor detects the change in IR radiation and triggers an output signal. PIR sensors are commonly used in motion-activated lighting systems, security alarms, and other applications requiring motion detection.
What is an ESP8266?
The ESP8266 is a popular Wi-Fi microcontroller module that allows you to connect your projects to the internet wirelessly. It is widely used in IoT (Internet of Things) applications, home automation, and more. The ESP8266 is known for its low cost, low power consumption, and ease of use, making it an ideal choice for building projects that require internet connectivity.
How to interface a PIR sensor with ESP8266?
Interfacing a PIR sensor with an ESP8266 is a relatively simple process. You will need the following components:
- PIR sensor
- ESP8266 module
- Jumper wires
- Breadboard
- USB cable for programming
Connect the PIR sensor to the ESP8266 as follows:
- VCC of PIR sensor to 3.3V on ESP8266
- GND of PIR sensor to GND on ESP8266
- Signal output of PIR sensor to any digital pin on ESP8266 (e.g., D1)
Once you have connected the PIR sensor to the ESP8266, you can begin writing the code to detect motion using the sensor.
Writing the code to detect motion
Below is a sample code snippet in Arduino IDE that demonstrates how to detect motion using a PIR sensor with an ESP8266:
void setup() {
   pinMode(D1, INPUT);
   Serial.begin(9600);
}

void loop() {
   if(digitalRead(D1) == HIGH){
       Serial.println("Motion detected!");
       delay(1000);
   }
}
In this code snippet, we first set the pinMode of the digital pin connected to the PIR sensor as INPUT in the setup function. In the loop function, we constantly check the state of the digital pin, and if it is HIGH (indicating motion detection), we print “Motion detected!” to the serial monitor.
Conclusion
With the above guide, you can now easily detect motion using a PIR sensor and ESP8266. Feel free to expand upon this project by adding more functionality, such as sending notifications or controlling other devices based on motion detection. The possibilities are endless!
We hope this article has been helpful in getting you started with your motion-sensing project. Happy tinkering!