How to use a DS18B20 temperature sensor with ESP8266?
Are you looking to build a temperature monitoring system using a DS18B20 temperature sensor and an ESP8266 microcontroller? In this guide, we will walk you through the steps to connect and read temperature data from the DS18B20 sensor using an ESP8266.
The DS18B20 is a popular digital temperature sensor that communicates over a 1-Wire bus protocol. It is accurate, easy-to-use, and can be easily interfaced with the ESP8266 to build IoT projects, smart home devices, weather stations, and more.
Let’s get started with the wiring connections. You will need the following components:
- ESP8266 NodeMCU Board
- DS18B20 Temperature Sensor
- 4.7kΩ Resistor
- Breadboard and Jumper Wires
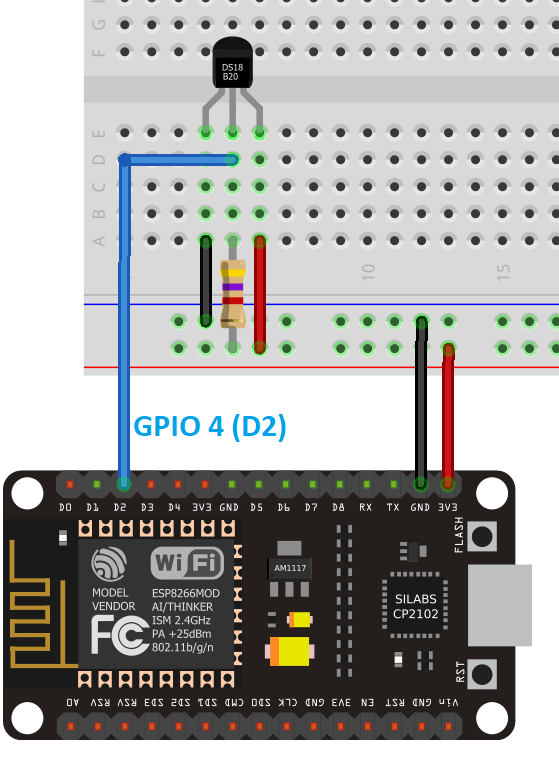
First, connect the VCC pin of the DS18B20 sensor to the 3.3V pin of the ESP8266. Next, connect the GND pin of the sensor to the GND pin of the ESP8266. Finally, connect the data pin (DQ) of the sensor to GPIO pin D4 of the ESP8266.
Next, you will need to install the necessary libraries for the DS18B20 sensor and the OneWire library. You can download these libraries from the Arduino Library Manager or from the GitHub repositories. Once the libraries are installed, you can start writing the code to read temperature data from the sensor.
Here is a sample code snippet to read temperature data from the DS18B20 sensor:
#include
#include

#define ONE_WIRE_BUS 2

OneWire oneWire(ONE_WIRE_BUS);
DallasTemperature sensors(&oneWire);

void setup() {
  Serial.begin(9600);
  sensors.begin();
}

void loop() {
  sensors.requestTemperatures();
  float temperature = sensors.getTempCByIndex(0);
  Serial.print("Temperature: ");
  Serial.println(temperature);
  delay(1000);
}
This code initializes the OneWire and DallasTemperature libraries, sets up the data pin for the sensor, and continuously reads the temperature data from the sensor every second.
Upload this code to your ESP8266 board and open the serial monitor to view the temperature readings. You should see the temperature values being printed every second.
With this setup, you can now build a variety of IoT projects such as temperature monitoring systems, smart thermostats, and more. Experiment with different sensors, add a display to visualize the data, or even send the data to a cloud platform for remote monitoring.
Now that you know how to use a DS18B20 temperature sensor with an ESP8266, it’s time to start building your own temperature monitoring projects. Have fun experimenting and creating innovative solutions with this powerful sensor and microcontroller combination!
How to use a DS18B20 temperature sensor with ESP8266?
Are you looking to build a temperature monitoring system using a DS18B20 temperature sensor and an ESP8266 microcontroller? In this guide, we will walk you through the steps to connect and read temperature data from the DS18B20 sensor using an ESP8266.
The DS18B20 is a popular digital temperature sensor that communicates over a 1-Wire bus protocol. It is accurate, easy-to-use, and can be easily interfaced with the ESP8266 to build IoT projects, smart home devices, weather stations, and more.
Let’s get started with the wiring connections. You will need the following components:
- ESP8266 NodeMCU Board
- DS18B20 Temperature Sensor
- 4.7kΩ Resistor
- Breadboard and Jumper Wires
First, connect the VCC pin of the DS18B20 sensor to the 3.3V pin of the ESP8266. Next, connect the GND pin of the sensor to the GND pin of the ESP8266. Finally, connect the data pin (DQ) of the sensor to GPIO pin D4 of the ESP8266.
Next, you will need to install the necessary libraries for the DS18B20 sensor and the OneWire library. You can download these libraries from the Arduino Library Manager or from the GitHub repositories. Once the libraries are installed, you can start writing the code to read temperature data from the sensor.
Here is a sample code snippet to read temperature data from the DS18B20 sensor:
#include
#include

#define ONE_WIRE_BUS 2

OneWire oneWire(ONE_WIRE_BUS);
DallasTemperature sensors(&oneWire);

void setup() {
  Serial.begin(9600);
  sensors.begin();
}

void loop() {
  sensors.requestTemperatures();
  float temperature = sensors.getTempCByIndex(0);
  Serial.print("Temperature: ");
  Serial.println(temperature);
  delay(1000);
}
This code initializes the OneWire and DallasTemperature libraries, sets up the data pin for the sensor, and continuously reads the temperature data from the sensor every second.
Upload this code to your ESP8266 board and open the serial monitor to view the temperature readings. You should see the temperature values being printed every second.
With this setup, you can now build a variety of IoT projects such as temperature monitoring systems, smart thermostats, and more. Experiment with different sensors, add a display to visualize the data, or even send the data to a cloud platform for remote monitoring.
Now that you know how to use a DS18B20 temperature sensor with an ESP8266, it’s time to start building your own temperature monitoring projects. Have fun experimenting and creating innovative solutions with this powerful sensor and microcontroller combination!