How to control a servo motor with ESP32?
Controlling a servo motor with an ESP32 microcontroller board is a relatively simple task that can be accomplished with just a few lines of code. Servo motors are widely used in robotics and automation projects for their accurate and precise control over angular position and speed. By interfacing a servo motor with an ESP32, you can create a range of interesting projects such as robotic arms, RC vehicles, and more.
In this tutorial, we will guide you through the process of setting up and controlling a servo motor with an ESP32 using the Arduino IDE. Before we begin, make sure you have the following hardware components:
- ESP32 development board
- Servo motor
- Jumper wires
Once you have gathered all the necessary components, follow the steps below to control a servo motor with ESP32:
Step 1: Setting up the hardware
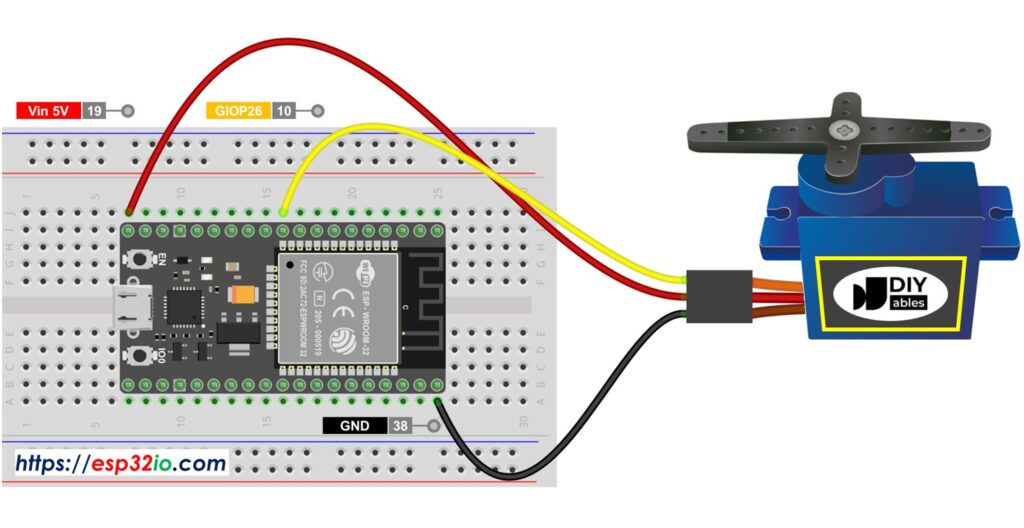
Begin by connecting the servo motor to the ESP32 development board. Connect the servo motor’s signal wire to pin 2 on the ESP32, the power wire to the 5V pin, and the ground wire to the GND pin. Make sure to secure the connections properly to avoid any loose connections or short circuits.
Step 2: Installing the ESP32 board in Arduino IDE
If you haven’t already, you will need to install the ESP32 board in the Arduino IDE. To do this, go to File > Preferences in Arduino IDE and paste the following URL into the Additional Board Manager URLs field:
https://dl.espressif.com/dl/package_esp32_index.json
Next, navigate to Tools > Board > Boards Manager, search for “ESP32” and install the ESP32 board.
Step 3: Writing the code
Open the Arduino IDE and create a new sketch. Copy and paste the following code:
#include

Servo myServo;  // create servo object to control a servo

void setup() {
  myServo.attach(2);  // attaches the servo on pin 2 to the servo object
}

void loop() {
  myServo.write(0);   // sets the servo position to 0 degrees
  delay(1000);        // waits for 1 second
  myServo.write(90);  // sets the servo position to 90 degrees
  delay(1000);        // waits for 1 second
  myServo.write(180); // sets the servo position to 180 degrees
  delay(1000);        // waits for 1 second
}
This code snippet initializes a servo motor connected to pin 2 on the ESP32 and rotates it to three different positions: 0 degrees, 90 degrees, and 180 degrees with a delay of 1 second between each position.
Step 4: Uploading the code
Connect the ESP32 development board to your computer using a USB cable and select the appropriate COM port in the Arduino IDE. Click the upload button to compile and upload the code to the ESP32. Once the upload is successful, you should see the servo motor rotating to the specified positions.
That’s it! You have successfully learned how to control a servo motor with an ESP32 microcontroller board. Feel free to experiment with different angles and timings to create more complex movements and behaviors for your servo motor projects.
Conclusion
Controlling a servo motor with an ESP32 opens up a world of possibilities for robotics and automation projects. By following the steps outlined in this tutorial, you can easily create dynamic and precise movements with your servo motor. Remember to always double-check your connections and code to ensure smooth operation of your projects. Have fun experimenting and creating with your ESP32 and servo motor!
How to control a servo motor with ESP32?
Controlling a servo motor with an ESP32 microcontroller board is a relatively simple task that can be accomplished with just a few lines of code. Servo motors are widely used in robotics and automation projects for their accurate and precise control over angular position and speed. By interfacing a servo motor with an ESP32, you can create a range of interesting projects such as robotic arms, RC vehicles, and more.
In this tutorial, we will guide you through the process of setting up and controlling a servo motor with an ESP32 using the Arduino IDE. Before we begin, make sure you have the following hardware components:
- ESP32 development board
- Servo motor
- Jumper wires
Once you have gathered all the necessary components, follow the steps below to control a servo motor with ESP32:
Step 1: Setting up the hardware
Begin by connecting the servo motor to the ESP32 development board. Connect the servo motor’s signal wire to pin 2 on the ESP32, the power wire to the 5V pin, and the ground wire to the GND pin. Make sure to secure the connections properly to avoid any loose connections or short circuits.
Step 2: Installing the ESP32 board in Arduino IDE
If you haven’t already, you will need to install the ESP32 board in the Arduino IDE. To do this, go to File > Preferences in Arduino IDE and paste the following URL into the Additional Board Manager URLs field:
https://dl.espressif.com/dl/package_esp32_index.json
Next, navigate to Tools > Board > Boards Manager, search for “ESP32” and install the ESP32 board.
Step 3: Writing the code
Open the Arduino IDE and create a new sketch. Copy and paste the following code:
#include

Servo myServo;  // create servo object to control a servo

void setup() {
  myServo.attach(2);  // attaches the servo on pin 2 to the servo object
}

void loop() {
  myServo.write(0);   // sets the servo position to 0 degrees
  delay(1000);        // waits for 1 second
  myServo.write(90);  // sets the servo position to 90 degrees
  delay(1000);        // waits for 1 second
  myServo.write(180); // sets the servo position to 180 degrees
  delay(1000);        // waits for 1 second
}
This code snippet initializes a servo motor connected to pin 2 on the ESP32 and rotates it to three different positions: 0 degrees, 90 degrees, and 180 degrees with a delay of 1 second between each position.
Step 4: Uploading the code
Connect the ESP32 development board to your computer using a USB cable and select the appropriate COM port in the Arduino IDE. Click the upload button to compile and upload the code to the ESP32. Once the upload is successful, you should see the servo motor rotating to the specified positions.
That’s it! You have successfully learned how to control a servo motor with an ESP32 microcontroller board. Feel free to experiment with different angles and timings to create more complex movements and behaviors for your servo motor projects.
Conclusion
Controlling a servo motor with an ESP32 opens up a world of possibilities for robotics and automation projects. By following the steps outlined in this tutorial, you can easily create dynamic and precise movements with your servo motor. Remember to always double-check your connections and code to ensure smooth operation of your projects. Have fun experimenting and creating with your ESP32 and servo motor!