How to Set Up an ESP8266 Temperature Logger
If you’re looking to monitor and log temperature data remotely, setting up an ESP8266 temperature logger is a great solution. The ESP8266 is a low-cost Wi-Fi microchip with full TCP/IP stack and microcontroller capability, making it perfect for connecting sensors and uploading data to the cloud. In this article, we’ll guide you through the steps to set up your own ESP8266 temperature logger.
Components Needed:
- ESP8266 NodeMCU
- DS18B20 temperature sensor
- Jumper wires
- USB cable
- Computer with Arduino IDE
- Wi-Fi network
- Cloud service (optional)
Step 1: Setting up Arduino IDE
First, you’ll need to install the Arduino IDE on your computer. Make sure to install the ESP8266 board package by going to File > Preferences > Additional Board Manager URLs and adding “http://arduino.esp8266.com/stable/package_esp8266com_index.json” to the list. Then go to Tools > Board > Boards Manager, search for ESP8266, and install the package.
Step 2: Wiring the Components
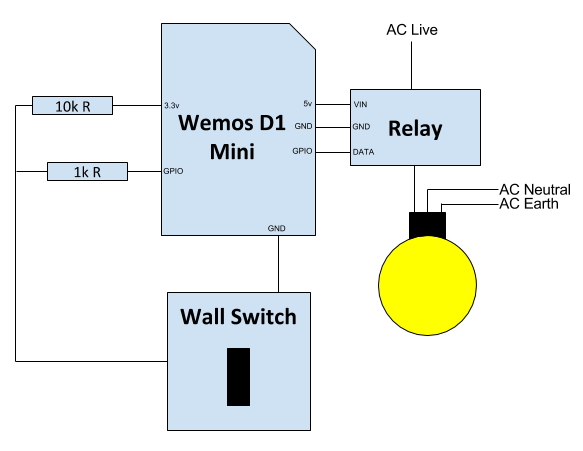
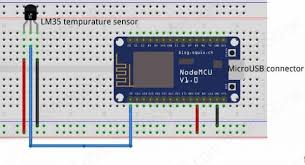
Connect the DS18B20 temperature sensor to the ESP8266 NodeMCU using jumper wires. Make sure to connect the VCC pin of the sensor to the 3.3V pin of the NodeMCU, GND to GND, and DATA to a GPIO pin (e.g. D2). Refer to the datasheet of the sensor for the pinout diagram.
Step 3: Coding the Temperature Logger
Open the Arduino IDE and create a new sketch. Include the OneWire and DallasTemperature libraries by going to Sketch > Include Library > Manage Libraries and searching for them. Then paste the following code into your sketch:
#include <OneWire.h>
#include <DallasTemperature.h>

#define ONE_WIRE_BUS 2
OneWire oneWire(ONE_WIRE_BUS);
DallasTemperature sensors(&oneWire);

void setup() {
  Serial.begin(9600);
  sensors.begin();
}

void loop() {
  sensors.requestTemperatures();
  float temperature = sensors.getTempCByIndex(0);
  Serial.print("Temperature: ");
  Serial.println(temperature);
  delay(10000);
}
Step 4: Uploading the Code
Connect the ESP8266 NodeMCU to your computer via USB. Select the correct board (NodeMCU 1.0) and port in the Arduino IDE. Click the Upload button to compile and upload the code to the ESP8266. Open the Serial Monitor to view the temperature readings.
Step 5: Logging Data
If you want to log temperature data remotely, you can send the data to a cloud service such as Thingspeak or Blynk. Modify the code to include Wi-Fi credentials and set up the data upload to the cloud. Check the documentation of the cloud service for instructions on setting up data logging.
Conclusion
Setting up an ESP8266 temperature logger is a fun and practical project that allows you to monitor temperature data easily. With the right components and a bit of coding, you can create your own temperature monitoring system. Have fun experimenting with different sensors and cloud services to enhance your temperature logging experience!
How to Set Up an ESP8266 Temperature Logger
If you’re looking to monitor and log temperature data remotely, setting up an ESP8266 temperature logger is a great solution. The ESP8266 is a low-cost Wi-Fi microchip with full TCP/IP stack and microcontroller capability, making it perfect for connecting sensors and uploading data to the cloud. In this article, we’ll guide you through the steps to set up your own ESP8266 temperature logger.
Components Needed:
- ESP8266 NodeMCU
- DS18B20 temperature sensor
- Jumper wires
- USB cable
- Computer with Arduino IDE
- Wi-Fi network
- Cloud service (optional)
Step 1: Setting up Arduino IDE
First, you’ll need to install the Arduino IDE on your computer. Make sure to install the ESP8266 board package by going to File > Preferences > Additional Board Manager URLs and adding “http://arduino.esp8266.com/stable/package_esp8266com_index.json” to the list. Then go to Tools > Board > Boards Manager, search for ESP8266, and install the package.
Step 2: Wiring the Components
Connect the DS18B20 temperature sensor to the ESP8266 NodeMCU using jumper wires. Make sure to connect the VCC pin of the sensor to the 3.3V pin of the NodeMCU, GND to GND, and DATA to a GPIO pin (e.g. D2). Refer to the datasheet of the sensor for the pinout diagram.
Step 3: Coding the Temperature Logger
Open the Arduino IDE and create a new sketch. Include the OneWire and DallasTemperature libraries by going to Sketch > Include Library > Manage Libraries and searching for them. Then paste the following code into your sketch:
#include <OneWire.h>
#include <DallasTemperature.h>

#define ONE_WIRE_BUS 2
OneWire oneWire(ONE_WIRE_BUS);
DallasTemperature sensors(&oneWire);

void setup() {
  Serial.begin(9600);
  sensors.begin();
}

void loop() {
  sensors.requestTemperatures();
  float temperature = sensors.getTempCByIndex(0);
  Serial.print("Temperature: ");
  Serial.println(temperature);
  delay(10000);
}
Step 4: Uploading the Code
Connect the ESP8266 NodeMCU to your computer via USB. Select the correct board (NodeMCU 1.0) and port in the Arduino IDE. Click the Upload button to compile and upload the code to the ESP8266. Open the Serial Monitor to view the temperature readings.
Step 5: Logging Data
If you want to log temperature data remotely, you can send the data to a cloud service such as Thingspeak or Blynk. Modify the code to include Wi-Fi credentials and set up the data upload to the cloud. Check the documentation of the cloud service for instructions on setting up data logging.
Conclusion
Setting up an ESP8266 temperature logger is a fun and practical project that allows you to monitor temperature data easily. With the right components and a bit of coding, you can create your own temperature monitoring system. Have fun experimenting with different sensors and cloud services to enhance your temperature logging experience!