How to Set Up an ESP8266 Mesh Network
Are you looking to set up an ESP8266 mesh network but don’t know where to start? Look no further! In this guide, we will walk you through the process of setting up your very own ESP8266 mesh network. Whether you’re a beginner or an experienced user, this article will provide you with the step-by-step instructions you need to get your mesh network up and running in no time.
What is an ESP8266 Mesh Network?
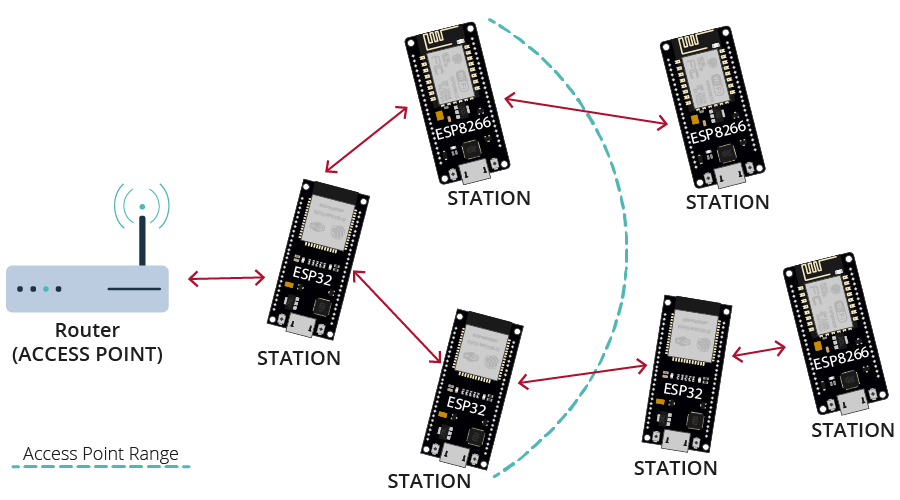
Before we dive into the setup process, let’s first understand what an ESP8266 mesh network is. An ESP8266 mesh network is a type of wireless network that allows multiple ESP8266 devices to communicate with each other without the need for a central router. This means that each ESP8266 device can act as a node in the network, relaying messages to other nodes in the network. Mesh networks are decentralized, self-healing, and can cover a large area with minimal infrastructure.
Step 1: Gather Your Materials
- ESP8266 devices (such as NodeMCU or Wemos D1 Mini)
- USB cables
- Computer with Arduino IDE installed
- WiFi network
Step 2: Install the ESP8266 Board Support Package
Before you can start setting up your ESP8266 mesh network, you will need to install the ESP8266 board support package in the Arduino IDE. To do this, open the Arduino IDE, go to File > Preferences, and paste the following URL into the “Additional Board Manager URLs” field: http://arduino.esp8266.com/stable/package_esp8266com_index.json. Then, go to Tools > Board > Boards Manager, search for “esp8266,” and click on “Install.”
Step 3: Set Up Your ESP8266 Devices
Now that you have installed the ESP8266 board support package, you can start setting up your ESP8266 devices. Connect your ESP8266 device to your computer using a USB cable, open the Arduino IDE, and select the correct board and port under Tools > Board and Tools > Port, respectively. Upload the following sketch to your ESP8266 device:
#include
void setup() {
Mesh.begin();
}
Step 4: Configure Your Mesh Network
Once you have set up your ESP8266 devices, it’s time to configure your mesh network. To do this, you will need to set up a WiFi network on each of your ESP8266 devices. You can do this by using the following code:
Mesh.addNetwork("your_network_name", "your_network_password");
Step 5: Test Your Mesh Network
After you have configured your mesh network, it’s time to test it out. Upload the following sketch to each of your ESP8266 devices:
void loop() {
Mesh.send("hello world!");
}
Step 6: Expand Your Mesh Network
Once you have successfully set up and tested your ESP8266 mesh network, you can begin to expand it by adding more ESP8266 devices. Simply repeat Steps 3-5 for each new device you want to add to your network. With each new device added, your mesh network will become more robust and reliable.
Conclusion
Setting up an ESP8266 mesh network may seem daunting at first, but with the right resources and guidance, you can easily create a powerful and flexible network that meets your specific needs. By following the steps outlined in this guide, you will be well on your way to creating your own ESP8266 mesh network in no time. Happy mesh networking!
Was this helpful?
0 / 0