How to use MQTT with ESP32?
If you’re looking to connect your ESP32 to an MQTT broker, you’ve come to the right place. MQTT (Message Queuing Telemetry Transport) is a popular messaging protocol that is widely used in the Internet of Things (IoT) space. In this article, we’ll walk you through the steps to set up and use MQTT with your ESP32 board.
What is MQTT?
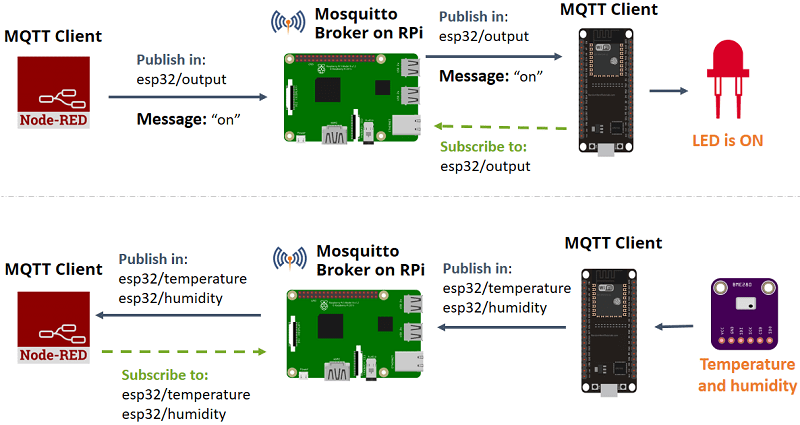
First, let’s understand what MQTT is. MQTT is a lightweight messaging protocol that is designed for devices with limited resources, which makes it perfect for IoT applications. It uses a publish/subscribe model where devices can publish messages to topics, and other devices can subscribe to those topics to receive the messages.
Setting up MQTT with ESP32
Now that you know what MQTT is, let’s get started with setting it up on your ESP32. Here are the steps:
- 1. Install the Arduino IDE on your computer if you haven’t already.
- 2. Open the Arduino IDE and navigate to File > Preferences.
- 3. In the “Additional Board Manager URLs” field, add the following URL:
http://dl.espressif.com/dl/package_esp32_index.json - 4. Click OK and navigate to Tools > Board > Boards Manager.
- 5. Search for “esp32” and install the ESP32 board by Espressif Systems.
- 6. Connect your ESP32 board to your computer via a USB cable.
- 7. Select your board by going to Tools > Board and selecting your ESP32 board.
- 8. Install the MQTT library by going to Sketch > Include Library > Manage Libraries and searching for “PubSubClient” by Nick O’Leary. Install the library.
- 9. Now you’re ready to write your MQTT code!
Writing MQTT code for ESP32
Here’s a simple example code for connecting your ESP32 to an MQTT broker:
#include <WiFi.h>
#include <PubSubClient.h>

const char* ssid = "YOUR_WIFI_SSID";
const char* password = "YOUR_WIFI_PASSWORD";
const char* mqttServer = "YOUR_MQTT_BROKER_IP";
const int mqttPort = 1883;

WiFiClient espClient;
PubSubClient client(espClient);

void setup() {
  Serial.begin(115200);
  WiFi.begin(ssid, password);

  while (WiFi.status() != WL_CONNECTED) {
    delay(500);
    Serial.println("Connecting to WiFi...");
  }

  client.setServer(mqttServer, mqttPort);
}

void loop() {
  if (!client.connected()) {
    reconnect();
  }
}

void reconnect() {
  while (!client.connected()) {
    Serial.print("Attempting MQTT connection...");
    if (client.connect("ESP32Client")) {
      Serial.println("connected");
    } else {
      Serial.print("failed, rc=");
      Serial.print(client.state());
      Serial.println(" try again in 5 seconds");
      delay(5000);
    }
  }
}
Conclusion
That’s it! You’ve now successfully set up MQTT with your ESP32 board. With MQTT, you can now easily publish and subscribe to messages with your IoT devices. Feel free to explore more advanced features and applications of MQTT with your ESP32. Happy tinkering!


