How to Program ESP8266 with Arduino IDE?
If you’re looking to start working with the ESP8266 WiFi module and Arduino IDE, you’re in the right place. The ESP8266 is a powerful and versatile WiFi module that can be programmed using the familiar Arduino IDE. In this article, I’ll guide you through the process of setting up your Arduino IDE to work with the ESP8266 and show you how to program it to build your own IoT projects.
Step 1: Install Arduino IDE and ESP8266 Board Support
The first step is to download and install the latest version of the Arduino IDE from the official website. Once you have the Arduino IDE installed, you’ll need to add support for the ESP8266 board. To do this, open the Arduino IDE, go to File > Preferences, and in the Additional Board Manager URLs field, enter the following URL:
http://arduino.esp8266.com/stable/package_esp8266com_index.json
Then, go to Tools > Board > Boards Manager, search for “ESP8266,” and install the latest version of the ESP8266 board package. After the installation is complete, you’ll be able to select your ESP8266 board from the Tools > Board menu.
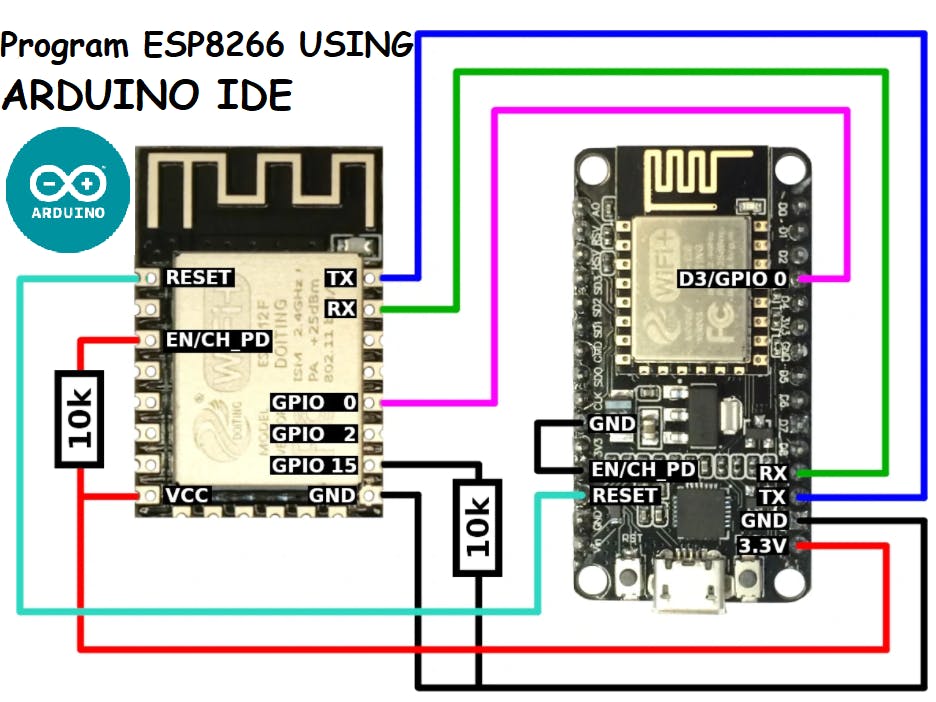
Step 2: Connect ESP8266 to Arduino
Before you can start programming your ESP8266 with the Arduino IDE, you’ll need to connect it to your computer. You can do this using a USB-to-Serial converter or a dedicated ESP8266 development board that has a built-in USB-to-Serial converter. Make sure to power the ESP8266 with a stable power source and connect the TX and RX pins to the corresponding pins on your Arduino board.
Step 3: Write and Upload Your Sketch
Now that you have your Arduino IDE set up and your ESP8266 connected, it’s time to write your first sketch. Open the Arduino IDE, select your ESP8266 board from the Tools > Board menu, and write your sketch. You can find plenty of ESP8266 example sketches online to get started.
Once you’ve written your sketch, click the Upload button to compile and upload the code to your ESP8266. You should see the upload progress in the Arduino IDE serial monitor. If everything goes well, your sketch will start running on the ESP8266, and you’ll be able to see the output in the serial monitor.
Step 4: Test Your ESP8266 Project
After successfully programming your ESP8266, it’s time to test your project. You can start by writing some simple test code to make sure everything is working correctly. For example, you could write a sketch to connect to a Wi-Fi network and send a message to a server.
Step 5: Expand Your ESP8266 Project
Once you’ve got the hang of programming the ESP8266 with Arduino IDE, you can start building more complex IoT projects. The ESP8266 is capable of connecting to various sensors, actuators, and other devices, making it a versatile platform for building all sorts of IoT applications.
By following these steps, you’ll be well on your way to mastering the ESP8266 and building your own IoT projects. So, grab your ESP8266 module, fire up the Arduino IDE, and start programming!
Was this helpful?
0 / 0