How to connect DHT22 to Raspberry Pi?
Connecting a DHT22 sensor to a Raspberry Pi is a great way to start experimenting with sensor data collection and analysis. The DHT22 is a popular sensor for measuring temperature and humidity, and with a few simple steps, you can easily connect it to your Raspberry Pi and start collecting data.
Materials Needed:
- Raspberry Pi (any model will do)
- DHT22 sensor
- Female-to-male jumper wires
- Resistor (10k ohm)
- Breadboard
Step 1: Wiring the DHT22 sensor
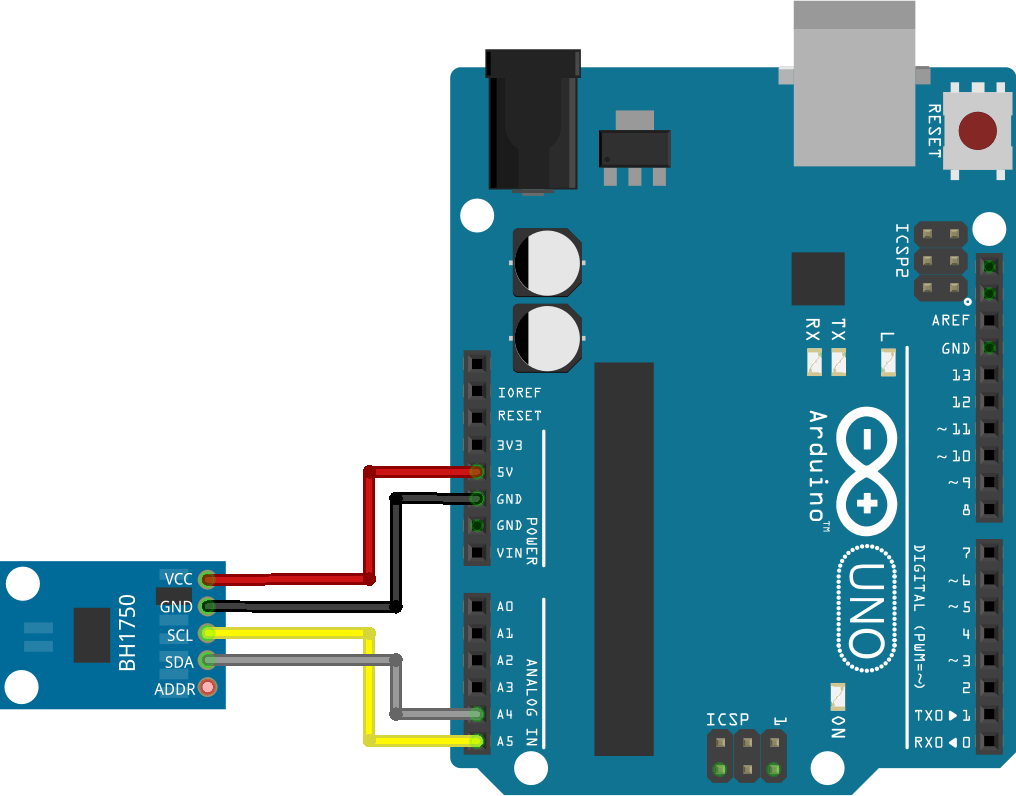
First, you need to wire up the DHT22 sensor to the Raspberry Pi. The DHT22 sensor has four pins: VCC, Data, NC (Not Connected), and GND. Use the female-to-male jumper wires to connect the sensor to the Raspberry Pi as follows:
- Connect the VCC pin of the DHT22 sensor to the 3.3V pin of the Raspberry Pi
- Connect the Data pin of the DHT22 sensor to GPIO pin 4 of the Raspberry Pi
- Connect the GND pin of the DHT22 sensor to a ground pin on the Raspberry Pi
- Connect a 10k ohm resistor between the VCC and Data pins of the DHT22 sensor
Step 2: Installing the necessary software
Next, you need to install the necessary software on your Raspberry Pi to read data from the DHT22 sensor. You can do this by using the Adafruit DHT library. To install the library, open a terminal window on your Raspberry Pi and run the following commands:
sudo apt-get update
sudo apt-get install build-essential python3-dev
git clone https://github.com/adafruit/Adafruit_Python_DHT.git
cd Adafruit_Python_DHT
sudo python setup.py install
After installing the Adafruit DHT library, you can test the connection between the DHT22 sensor and the Raspberry Pi by running the following command:
sudo python examples/AdafruitDHT.py 22 4
If everything is set up correctly, you should see the temperature and humidity readings from the DHT22 sensor displayed on your terminal.
Step 3: Saving the sensor data
Once you have successfully connected the DHT22 sensor to your Raspberry Pi and read data from it, you can now save the sensor data to a file for further analysis. You can do this by writing a simple Python script that reads data from the sensor and writes it to a text file.
# Python script to read data from DHT22 sensor and save to file

import Adafruit_DHT

sensor = Adafruit_DHT.DHT22
pin = 4

humidity, temperature = Adafruit_DHT.read_retry(sensor, pin)

if humidity is not None and temperature is not None:
    with open('sensor_data.txt', 'a') as f:
        f.write(f'Temperature: {temperature}C, Humidity: {humidity}%\n')
else:
    print('Failed to read data from sensor')
Save the above Python script to a file on your Raspberry Pi and run it to start collecting sensor data. The data will be saved to a text file named sensor_data.txt in the same directory as the script.
Conclusion
Connecting a DHT22 sensor to a Raspberry Pi is a fun and educational project that can help you learn more about sensor data collection and analysis. With the right materials and software, you can easily set up a DHT22 sensor on your Raspberry Pi and start collecting temperature and humidity data. Have fun exploring the world of sensor technology!
How to connect DHT22 to Raspberry Pi?
Connecting a DHT22 sensor to a Raspberry Pi is a great way to start experimenting with sensor data collection and analysis. The DHT22 is a popular sensor for measuring temperature and humidity, and with a few simple steps, you can easily connect it to your Raspberry Pi and start collecting data.
Materials Needed:
- Raspberry Pi (any model will do)
- DHT22 sensor
- Female-to-male jumper wires
- Resistor (10k ohm)
- Breadboard
Step 1: Wiring the DHT22 sensor
First, you need to wire up the DHT22 sensor to the Raspberry Pi. The DHT22 sensor has four pins: VCC, Data, NC (Not Connected), and GND. Use the female-to-male jumper wires to connect the sensor to the Raspberry Pi as follows:
- Connect the VCC pin of the DHT22 sensor to the 3.3V pin of the Raspberry Pi
- Connect the Data pin of the DHT22 sensor to GPIO pin 4 of the Raspberry Pi
- Connect the GND pin of the DHT22 sensor to a ground pin on the Raspberry Pi
- Connect a 10k ohm resistor between the VCC and Data pins of the DHT22 sensor
Step 2: Installing the necessary software
Next, you need to install the necessary software on your Raspberry Pi to read data from the DHT22 sensor. You can do this by using the Adafruit DHT library. To install the library, open a terminal window on your Raspberry Pi and run the following commands:
sudo apt-get update
sudo apt-get install build-essential python3-dev
git clone https://github.com/adafruit/Adafruit_Python_DHT.git
cd Adafruit_Python_DHT
sudo python setup.py install
After installing the Adafruit DHT library, you can test the connection between the DHT22 sensor and the Raspberry Pi by running the following command:
sudo python examples/AdafruitDHT.py 22 4
If everything is set up correctly, you should see the temperature and humidity readings from the DHT22 sensor displayed on your terminal.
Step 3: Saving the sensor data
Once you have successfully connected the DHT22 sensor to your Raspberry Pi and read data from it, you can now save the sensor data to a file for further analysis. You can do this by writing a simple Python script that reads data from the sensor and writes it to a text file.
# Python script to read data from DHT22 sensor and save to file

import Adafruit_DHT

sensor = Adafruit_DHT.DHT22
pin = 4

humidity, temperature = Adafruit_DHT.read_retry(sensor, pin)

if humidity is not None and temperature is not None:
    with open('sensor_data.txt', 'a') as f:
        f.write(f'Temperature: {temperature}C, Humidity: {humidity}%\n')
else:
    print('Failed to read data from sensor')
Save the above Python script to a file on your Raspberry Pi and run it to start collecting sensor data. The data will be saved to a text file named sensor_data.txt in the same directory as the script.
Conclusion
Connecting a DHT22 sensor to a Raspberry Pi is a fun and educational project that can help you learn more about sensor data collection and analysis. With the right materials and software, you can easily set up a DHT22 sensor on your Raspberry Pi and start collecting temperature and humidity data. Have fun exploring the world of sensor technology!