How to Wire a CD4093 NAND Gate
If you’re looking to wire a CD4093 NAND gate, you’re in the right place! In this guide, we’ll walk you through the process step by step to ensure you can successfully integrate this versatile component into your circuit design.
Before we dive into the wiring process, let’s first understand what a CD4093 NAND gate is and why you might want to use one. The CD4093 is a quad two-input NAND gate that is part of the CMOS logic family. It is known for its low power consumption and high noise immunity, making it an excellent choice for various digital applications.
Now, let’s get started with wiring the CD4093 NAND gate.
Step 1: Gather your Materials
- CD4093 NAND gate IC
- Breadboard
- Jumper wires
- Power supply
- LEDs (Optional for testing)
Step 2: Identify Pin Configuration
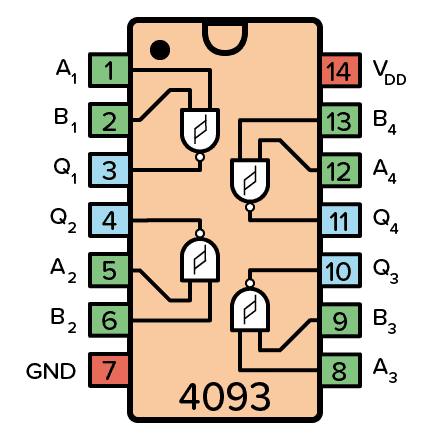
Before wiring the CD4093 NAND gate, it’s essential to familiarize yourself with the pin configuration. The CD4093 IC has 14 pins, with each pin serving a specific function. Refer to the datasheet or manufacturer’s documentation for the exact pin layout.
Step 3: Wire the Power Supply
Start by connecting the VCC pin (Pin 14) of the CD4093 NAND gate to the positive terminal of your power supply. Similarly, connect the GND pin (Pin 7) to the negative terminal of the power supply to provide the necessary voltage and ground reference for the IC.
Step 4: Connect Input and Output Pins
Next, wire the input pins (Pin 1 and Pin 2) of the CD4093 NAND gate to your desired logic inputs. The two-input NAND gate will output the logical complement of the AND operation between its input pins. Connect the output pin (Pin 3) to your desired output device or another component in your circuit.
Step 5: Test the Circuit
Once you have wired the CD4093 NAND gate according to your circuit design, it’s time to test the functionality. Apply the appropriate logic levels to the input pins and observe the output. You can use LEDs or a multimeter to check the logic levels and verify the gate’s operation.
Congratulations! You have successfully wired a CD4093 NAND gate. Feel free to experiment with different logic configurations and circuit designs to explore the versatility of this versatile IC.
We hope this guide has been helpful in understanding how to wire a CD4093 NAND gate. If you have any questions or need further assistance, don’t hesitate to reach out to us.
Was this helpful?
0 / 0