How to Connect a DS18B20 Temperature Sensor
Are you looking to monitor temperature levels with precision? The DS18B20 temperature sensor is a popular choice due to its accuracy and ease of use. In this guide, we will walk you through the steps of connecting a DS18B20 sensor to your microcontroller, Raspberry Pi, or Arduino board.
The DS18B20 sensor uses the OneWire protocol, which allows you to connect multiple sensors to a single pin of your microcontroller. This makes it ideal for projects that require monitoring temperature in different locations.
Materials Needed:
- DS18B20 temperature sensor
- Microcontroller board (Arduino, Raspberry Pi, etc.)
- 4.7kΩ resistor
- Breadboard and jumper wires
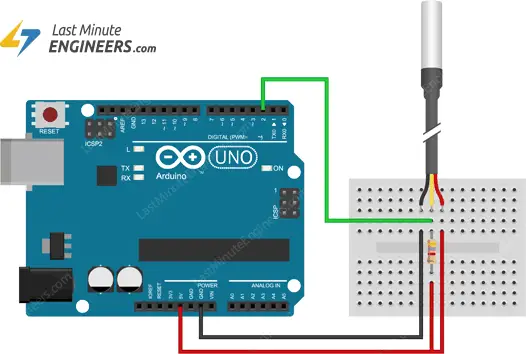
Circuit Connection:
To connect the DS18B20 sensor to your microcontroller board, follow these steps:
- Step 1: Insert the DS18B20 sensor into the breadboard.
- Step 2: Connect the VDD pin of the sensor to the 3.3V or 5V pin on your microcontroller board.
- Step 3: Connect the GND pin of the sensor to the GND pin on your microcontroller board.
- Step 4: Connect the DQ pin of the sensor to a digital pin on your microcontroller board.
- Step 5: Connect a 4.7kΩ resistor between the VDD and DQ pins of the sensor.
Once you have connected the sensor to your microcontroller board, you are ready to start reading temperature values. Depending on your microcontroller, you can use libraries such as DallasTemperature or OneWire to communicate with the DS18B20 sensor.
Code Sample:
Here is an example code snippet in Arduino to read temperature values from a DS18B20 sensor:
#include
#include

#define ONE_WIRE_BUS 2

OneWire oneWire(ONE_WIRE_BUS);
DallasTemperature sensors(&oneWire);

void setup() {
  Serial.begin(9600);
  sensors.begin();
}

void loop() {
  sensors.requestTemperatures();
  float temperature = sensors.getTempCByIndex(0);
  Serial.print("Temperature: ");
  Serial.print(temperature);
  Serial.println(" °C");
  delay(1000);
}
Upload the code to your Arduino board and open the Serial Monitor to view real-time temperature readings from the DS18B20 sensor.
Conclusion
Connecting a DS18B20 temperature sensor is a straightforward process that can enhance your temperature monitoring projects. By following the steps outlined in this guide, you can start collecting accurate temperature data with ease.
Do you have any questions or tips on connecting a DS18B20 sensor? Feel free to share them in the comments below!
How to Connect a DS18B20 Temperature Sensor
Are you looking to monitor temperature levels with precision? The DS18B20 temperature sensor is a popular choice due to its accuracy and ease of use. In this guide, we will walk you through the steps of connecting a DS18B20 sensor to your microcontroller, Raspberry Pi, or Arduino board.
The DS18B20 sensor uses the OneWire protocol, which allows you to connect multiple sensors to a single pin of your microcontroller. This makes it ideal for projects that require monitoring temperature in different locations.
Materials Needed:
- DS18B20 temperature sensor
- Microcontroller board (Arduino, Raspberry Pi, etc.)
- 4.7kΩ resistor
- Breadboard and jumper wires
Circuit Connection:
To connect the DS18B20 sensor to your microcontroller board, follow these steps:
- Step 1: Insert the DS18B20 sensor into the breadboard.
- Step 2: Connect the VDD pin of the sensor to the 3.3V or 5V pin on your microcontroller board.
- Step 3: Connect the GND pin of the sensor to the GND pin on your microcontroller board.
- Step 4: Connect the DQ pin of the sensor to a digital pin on your microcontroller board.
- Step 5: Connect a 4.7kΩ resistor between the VDD and DQ pins of the sensor.
Once you have connected the sensor to your microcontroller board, you are ready to start reading temperature values. Depending on your microcontroller, you can use libraries such as DallasTemperature or OneWire to communicate with the DS18B20 sensor.
Code Sample:
Here is an example code snippet in Arduino to read temperature values from a DS18B20 sensor:
#include
#include

#define ONE_WIRE_BUS 2

OneWire oneWire(ONE_WIRE_BUS);
DallasTemperature sensors(&oneWire);

void setup() {
  Serial.begin(9600);
  sensors.begin();
}

void loop() {
  sensors.requestTemperatures();
  float temperature = sensors.getTempCByIndex(0);
  Serial.print("Temperature: ");
  Serial.print(temperature);
  Serial.println(" °C");
  delay(1000);
}
Upload the code to your Arduino board and open the Serial Monitor to view real-time temperature readings from the DS18B20 sensor.
Conclusion
Connecting a DS18B20 temperature sensor is a straightforward process that can enhance your temperature monitoring projects. By following the steps outlined in this guide, you can start collecting accurate temperature data with ease.
Do you have any questions or tips on connecting a DS18B20 sensor? Feel free to share them in the comments below!