How to Test a CD40106 Schmitt Trigger
CD40106 is a versatile integrated circuit that contains 6 Schmitt trigger inverters. It is commonly used in digital circuits for signal conditioning, wave shaping, and oscillator applications. Testing a CD40106 Schmitt trigger is an important step to ensure its proper functionality. In this article, we will discuss the steps to test a CD40106 Schmitt trigger.
Materials Needed:
- CD40106 Schmitt Trigger IC
- Breadboard
- Jumper wires
- Power supply
- Oscilloscope or multimeter
Testing Procedure:
Before starting the testing process, make sure to handle the CD40106 IC with care to avoid any damage. Follow these steps to test the CD40106 Schmitt trigger:
Step 1: Power Supply Connection
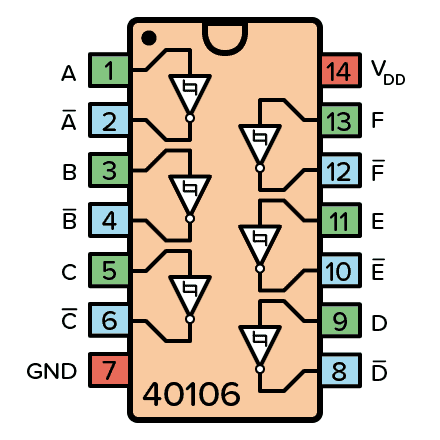
Connect the VDD pin (pin 14) to the positive terminal of the power supply and the VSS pin (pin 7) to the negative terminal of the power supply. The recommended supply voltage for CD40106 is between 5V to 15V.
Step 2: Input and Output Connections
Connect the input signal to one of the inverter gates (pins 1, 3, 5, 9, 11, or 13) and observe the output at the corresponding output pin (2, 4, 6, 8, 10, or 12). Use a breadboard and jumper wires for making the connections.
Step 3: Signal Testing
Apply a square wave or any other input signal to the input gate and monitor the output using an oscilloscope or multimeter. The output should exhibit the characteristics of a Schmitt trigger with hysteresis.
Interpreting the Results:
When testing a CD40106 Schmitt trigger, here are some key points to keep in mind:
- Output Signal: The output should switch from low to high and vice versa at the specified threshold voltages.
- Hysteresis: The output should show a gap between the upper and lower threshold voltages, indicating hysteresis.
- Noise Immunity: The Schmitt trigger should exhibit good noise immunity by rejecting small fluctuations in the input signal.
Conclusion
Testing a CD40106 Schmitt trigger is a crucial step in ensuring its proper functionality in digital circuits. By following the steps outlined in this article, you can verify the performance of the Schmitt trigger and troubleshoot any potential issues. Remember to handle the IC with care and use proper equipment for testing.
Experiment with different input signals and observe the corresponding output to get a better understanding of the CD40106 Schmitt trigger’s behavior. Have fun testing and exploring the capabilities of this versatile IC!
Was this helpful?
0 / 0