How to Use a MAX7219 LED Driver?
If you’re looking to control multiple LED displays with ease, the MAX7219 LED driver is your best bet. This convenient integrated circuit is designed to drive up to 64 individual LEDs, making it perfect for projects that involve large arrays of lights. In this article, we’ll walk you through the basics of using a MAX7219 LED driver and provide you with some tips and tricks for getting the most out of this versatile component.
What is a MAX7219 LED Driver?
The MAX7219 is a popular LED display driver that can control up to 64 individual LEDs using just three pins from a microcontroller. This makes it ideal for projects that require the simultaneous control of multiple lights, such as digital clocks, scoreboards, and scrolling displays. The MAX7219 uses a technique known as multiplexing to control the brightness of each LED in the array, allowing you to create dynamic and eye-catching visual effects.
Setting Up Your MAX7219
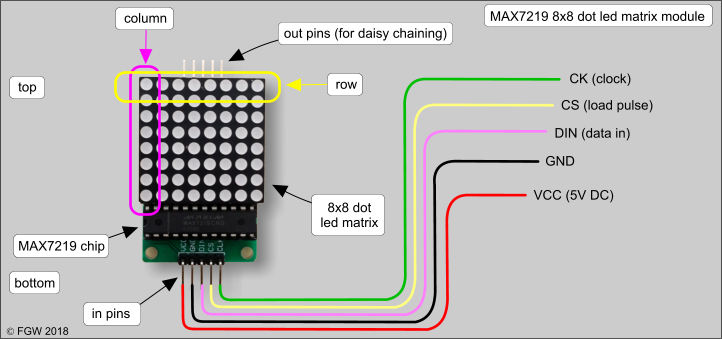
Before you can start using your MAX7219 LED driver, you’ll need to wire it up correctly to your microcontroller. The MAX7219 comes in a compact 24-pin DIP package that can be easily mounted on a breadboard or PCB. To wire up your MAX7219, connect the following pins to your microcontroller:
- VCC – Connect this pin to the 5V power supply
- GND – Connect this pin to the ground of your circuit
- DIN – Connect this pin to the data input of your microcontroller
- CS – Connect this pin to the chip select pin of your microcontroller
- CLK – Connect this pin to the clock input of your microcontroller
Once you’ve wired up your MAX7219, you’ll need to install the necessary libraries on your microcontroller to communicate with the driver. Most popular microcontroller platforms, such as Arduino, have libraries available that make it easy to control the MAX7219 using simple commands.
Controlling Your LED Display
With your MAX7219 wired up and the libraries installed on your microcontroller, you’re now ready to start controlling your LED display. The MAX7219 driver uses a simple protocol that allows you to set the brightness of individual LEDs, turn them on and off, and scroll text across the display.
To control your LED display, you’ll need to send commands to the MAX7219 using the SPI protocol. This involves sending a series of bytes to the driver that tell it which LEDs to turn on or off and at what brightness level. By sending the right commands in the right order, you can create a wide variety of visual effects on your display.
Tips and Tricks
Here are a few tips and tricks to help you get the most out of your MAX7219 LED driver:
- Experiment with different brightness levels to create dynamic lighting effects
- Use the built-in scrolling feature to display text messages on your LED array
- Combine multiple MAX7219 drivers to control even more LEDs in your project
- Consider using a separate power supply for the LEDs to prevent interference with the microcontroller
- Utilize libraries that offer extra features like animations and image display
With these tips in mind, you’ll be well on your way to creating stunning LED displays with the MAX7219 LED driver. Whether you’re a beginner or an experienced maker, the MAX7219 is a versatile and powerful component that will take your projects to the next level.
Conclusion
The MAX7219 LED driver is a fantastic component for anyone looking to create dynamic and eye-catching LED displays. With its ease of use and powerful features, the MAX7219 is a must-have for any electronics enthusiast. By following the steps outlined in this article and experimenting with different visual effects, you’ll be able to unlock the full potential of the MAX7219 and create impressive LED projects that are sure to turn heads.
Was this helpful?
0 / 0