How to Wire a KBPC3510 Bridge Rectifier
Bridge rectifiers are essential components in electronic circuits that convert alternating current (AC) to direct current (DC). The KBPC3510 is a popular bridge rectifier widely used in power supplies and other electronic devices. In this guide, we will walk you through the process of wiring a KBPC3510 bridge rectifier correctly to ensure optimal performance.
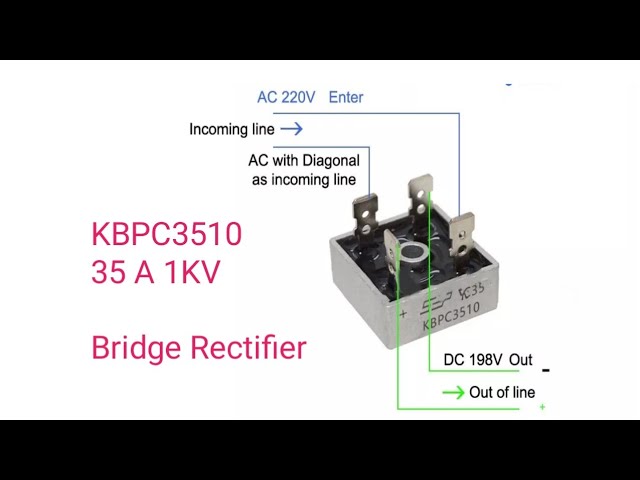
Step 1: Identify the Pins
The KBPC3510 bridge rectifier has four pins – two for the AC input and two for the DC output. The AC input pins are usually marked with a tilde (~) symbol, while the DC output pins are marked with a plus (+) and a minus (-) sign. Make sure to identify these pins before proceeding with the wiring process.
Step 2: Connect the AC Input
Start by connecting the AC input wires to the corresponding pins on the bridge rectifier. The incoming AC power source should be connected to the two AC input pins marked with the tilde (~) symbol. Make sure to solder the wires securely to ensure a stable connection.
Step 3: Connect the DC Output
Next, connect the DC output wires to the respective pins on the bridge rectifier. The positive (+) DC output should be connected to the pin marked with a plus sign, while the negative (-) DC output should be connected to the pin marked with a minus sign. Again, ensure secure soldering for a reliable connection.
Step 4: Test the Connection
Before powering up your circuit, it is crucial to test the connection between the KBPC3510 bridge rectifier and the input and output wires. Use a multimeter to check for continuity and ensure that there are no short circuits or loose connections. This step is essential to prevent damage to your circuit or the bridge rectifier.
Step 5: Secure the Bridge Rectifier
Once you have confirmed that the wiring is correct and secure, it is essential to mount the KBPC3510 bridge rectifier properly. Use insulating materials like heat sinks or silicone pads to prevent overheating and ensure the long-term reliability of the component. Avoid placing the bridge rectifier near heat sources or in areas with poor ventilation.
Conclusion
Wiring a KBPC3510 bridge rectifier is a straightforward process that requires attention to detail and proper soldering techniques. By following the steps outlined in this guide, you can successfully wire a KBPC3510 bridge rectifier in your electronic circuits. Remember to test the connection before powering up your circuit and secure the bridge rectifier to prevent damage. We hope this guide has been helpful, and you can now confidently wire a KBPC3510 bridge rectifier in your projects.
Was this helpful?
1 / 0