How to Use an HT12E Encoder IC
Today we’ll be diving into the world of HT12E encoder ICs. These tiny chips may seem intimidating at first, but fear not – with a bit of guidance, you’ll be able to harness their power and unlock a whole new realm of possibilities.
First things first, what exactly is an HT12E encoder IC? In simple terms, it’s a component that takes in parallel data and converts it into a serial output. This process is essential for various applications, such as remote control systems, security systems, and data transmission.
Now, let’s get into the nitty-gritty of how to use an HT12E encoder IC:
Step 1: Connect the Pins
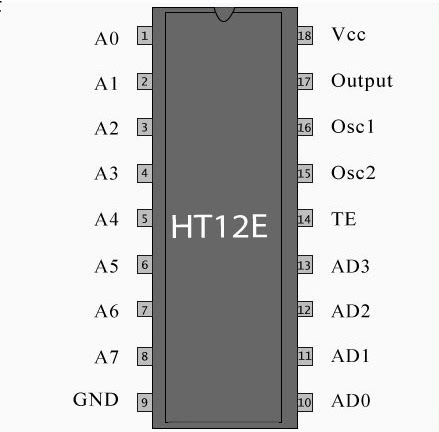
Before you can start using the HT12E encoder IC, you’ll need to connect it to your circuit. The chip has a total of 18 pins, each serving a specific purpose. Make sure to consult the datasheet for the exact pin configuration.
Once you’ve identified the pins, carefully solder the HT12E encoder IC onto your circuit board, ensuring that each pin is securely connected.
Step 2: Provide Power
Next, you’ll need to provide power to the HT12E encoder IC. The chip typically operates at a voltage range of 2.4V to 12V, so make sure to supply the appropriate voltage to avoid damaging the chip.
Connect the VCC and ground pins of the HT12E encoder IC to your power source, ensuring that the polarity is correct to prevent any mishaps.
Step 3: Input Data
With the HT12E encoder IC properly connected and powered, it’s time to input your data. The chip accepts parallel data through its data pins, allowing you to transmit information effectively.
You can connect external devices, such as sensors or switches, to the data pins of the HT12E encoder IC to send signals to your receiver circuit.
Step 4: Generate Output
Once the HT12E encoder IC receives the parallel data, it converts it into serial data, ready for transmission. The chip uses a synchronized binary data stream to ensure accurate and reliable communication.
You can connect the output pin of the HT12E encoder IC to your transmitter circuit, allowing you to send the encoded data to the receiver circuit wirelessly or through a wired connection.
Step 5: Test and Troubleshoot
Before deploying your HT12E encoder IC in your final application, it’s crucial to test its functionality and address any potential issues. Use a logic analyzer or an oscilloscope to monitor the serial output and ensure that the data is being transmitted correctly.
If you encounter any problems, double-check the connections, power supply, and data input to pinpoint the source of the issue. Troubleshooting is an essential part of the engineering process and can help you optimize your design for maximum efficiency.
With these steps, you should now have a better understanding of how to use an HT12E encoder IC in your projects. Remember to consult the datasheet for detailed specifications and experiment with different configurations to unlock the full potential of this versatile chip.
Happy coding!
Was this helpful?
0 / 0