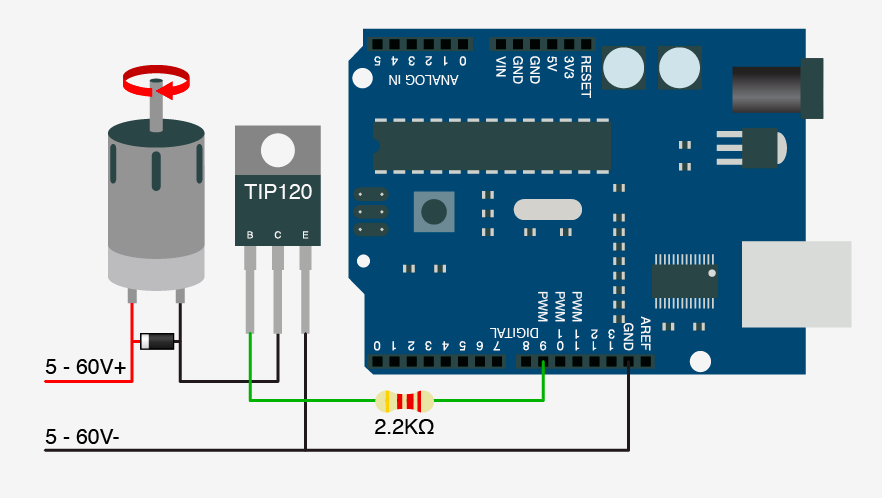
How to Wire a TIP120 Transistor?
Transistors are essential components in electronic circuits, serving as amplifiers or switches. The TIP120 transistor, in particular, is a popular choice due to its high voltage and current capability. In this article, we will guide you on how to wire a TIP120 transistor effectively.
Understanding the TIP120 Transistor
Before diving into the wiring process, it’s vital to understand the basic functioning of the TIP120 transistor. The TIP120 is a Darlington transistor, meaning it consists of two bipolar transistors in a single package. This configuration provides high current gain, making it suitable for applications requiring a robust switch or amplifier.
The TIP120 transistor has three terminals: the Base (B), Collector (C), and Emitter (E). To wire the TIP120 properly, you need to connect these terminals correctly in your circuit.
Wiring the TIP120 Transistor
Follow these steps to wire a TIP120 transistor efficiently:
- Identify the pins: Begin by identifying the Base, Collector, and Emitter pins of the TIP120 transistor. The pinout can typically be found in the datasheet or marked on the package.
- Connect the Base: Connect a resistor between the input signal source and the Base pin of the TIP120 transistor. This resistor limits the current flowing into the Base, preventing damage to the transistor.
- Link the Collector: Connect the load (such as a motor or LED) between the positive power supply and the Collector pin of the TIP120 transistor.
- Ground the Emitter: Finally, connect the Emitter pin of the TIP120 transistor to the ground reference of your circuit.
Ensure that all connections are secure and check for any short circuits before applying power to the circuit. It’s also recommended to use a heat sink with the TIP120 transistor, especially when dealing with high currents to prevent overheating.
Testing the Circuit
After wiring the TIP120 transistor, test the circuit to verify its functionality. Apply power to the circuit and observe whether the load (e.g., motor or LED) responds as expected. If there are any issues, double-check the wiring connections and ensure everything is correctly configured.
Conclusion
Wiring a TIP120 transistor may seem daunting at first, but by following these steps and understanding the transistor’s functionality, you can effectively utilize its capabilities in your electronic projects. Remember to take precautions such as using a heat sink and double-checking connections to ensure a safe and reliable circuit.
Was this helpful?
0 / 0