How to Use a 16×2 LCD with I2C
Using a 16×2 LCD with I2C is a great way to display information from your Arduino or other microcontroller projects. I2C, or Inter-Integrated Circuit, is a communication protocol that allows multiple devices to communicate with each other using just two wires.
With a 16×2 LCD, you can display text, numbers, and symbols in a clear and easy-to-read format. In this guide, we’ll walk you through the steps to connect and use a 16×2 LCD with I2C.
Materials Needed
- Arduino or other microcontroller
- 16×2 LCD with I2C module
- Jumper wires
- Soldering iron and solder (optional)
Step 1: Connect the LCD
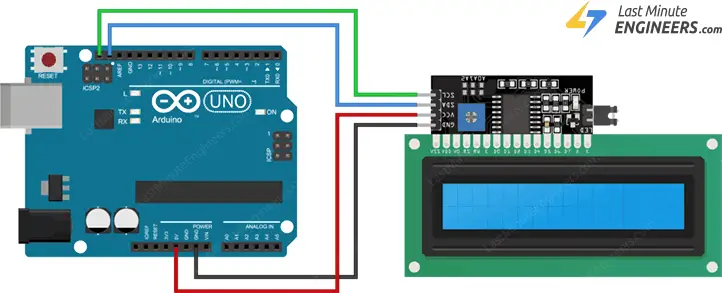
Start by connecting the I2C module to the 16×2 LCD. The module will have four pins: VCC, GND, SDA, and SCL. Connect VCC to 5V, GND to GND, SDA to A4, and SCL to A5 on your Arduino or other microcontroller.
If your LCD does not come with an I2C module, you can solder the wires directly to the LCD pins. Connect the VCC and GND pins to the corresponding pins on your microcontroller, and connect the SDA and SCL pins to the appropriate digital pins.
Step 2: Install the Library
To use the 16×2 LCD with I2C, you will need to install the LiquidCrystal_I2C library. Open the Arduino IDE, go to Sketch > Include Library > Manage Libraries, and search for “LiquidCrystal_I2C”. Click Install to add the library to your IDE.
After installing the library, include it in your sketch by adding the following line at the beginning:
#include <LiquidCrystal_I2C.h>
Step 3: Initialize the LCD
In your setup function, initialize the LCD by defining the number of columns and rows. Use the following code snippet:
LiquidCrystal_I2C lcd(0x27, 16, 2);
Replace “0x27” with the address of your I2C module if it is different. This line of code tells the Arduino that you are using a 16×2 LCD with an I2C address of 0x27.
Step 4: Display Text
Now you can start displaying text on the LCD. Use the lcd.print() function to write text to the screen. For example, to display “Hello, World!” on the first row, use:
lcd.setCursor(0, 0);
lcd.print("Hello, World!");
This code sets the cursor to the first position on the first row and prints the text. You can customize the text and position as needed.
Step 5: Additional Features
Once you have the basic functionality working, you can explore additional features like scrolling, custom characters, and backlight control. Check the LiquidCrystal_I2C library documentation for more information on these advanced features.
With these steps, you can easily use a 16×2 LCD with I2C in your Arduino projects. Experiment with different text, numbers, and symbols to create informative and interactive displays for your projects.
How to Use a 16×2 LCD with I2C
Using a 16×2 LCD with I2C is a great way to display information from your Arduino or other microcontroller projects. I2C, or Inter-Integrated Circuit, is a communication protocol that allows multiple devices to communicate with each other using just two wires.
With a 16×2 LCD, you can display text, numbers, and symbols in a clear and easy-to-read format. In this guide, we’ll walk you through the steps to connect and use a 16×2 LCD with I2C.
Materials Needed
- Arduino or other microcontroller
- 16×2 LCD with I2C module
- Jumper wires
- Soldering iron and solder (optional)
Step 1: Connect the LCD
Start by connecting the I2C module to the 16×2 LCD. The module will have four pins: VCC, GND, SDA, and SCL. Connect VCC to 5V, GND to GND, SDA to A4, and SCL to A5 on your Arduino or other microcontroller.
If your LCD does not come with an I2C module, you can solder the wires directly to the LCD pins. Connect the VCC and GND pins to the corresponding pins on your microcontroller, and connect the SDA and SCL pins to the appropriate digital pins.
Step 2: Install the Library
To use the 16×2 LCD with I2C, you will need to install the LiquidCrystal_I2C library. Open the Arduino IDE, go to Sketch > Include Library > Manage Libraries, and search for “LiquidCrystal_I2C”. Click Install to add the library to your IDE.
After installing the library, include it in your sketch by adding the following line at the beginning:
#include <LiquidCrystal_I2C.h>
Step 3: Initialize the LCD
In your setup function, initialize the LCD by defining the number of columns and rows. Use the following code snippet:
LiquidCrystal_I2C lcd(0x27, 16, 2);
Replace “0x27” with the address of your I2C module if it is different. This line of code tells the Arduino that you are using a 16×2 LCD with an I2C address of 0x27.
Step 4: Display Text
Now you can start displaying text on the LCD. Use the lcd.print() function to write text to the screen. For example, to display “Hello, World!” on the first row, use:
lcd.setCursor(0, 0);
lcd.print("Hello, World!");
This code sets the cursor to the first position on the first row and prints the text. You can customize the text and position as needed.
Step 5: Additional Features
Once you have the basic functionality working, you can explore additional features like scrolling, custom characters, and backlight control. Check the LiquidCrystal_I2C library documentation for more information on these advanced features.
With these steps, you can easily use a 16×2 LCD with I2C in your Arduino projects. Experiment with different text, numbers, and symbols to create informative and interactive displays for your projects.