How to Test an ATmega328P Microcontroller
Testing an ATmega328P microcontroller is an essential step to ensure that your project runs smoothly and without any hiccups. The ATmega328P is a popular microcontroller that is commonly used in many DIY electronics projects, such as Arduino.
There are several methods you can use to test an ATmega328P microcontroller to make sure it is working correctly. In this article, we will discuss some of the most common ways to test your ATmega328P microcontroller.
1. Using a Programmer
One of the most common ways to test an ATmega328P microcontroller is by using a programmer. A programmer is a hardware device that connects to your microcontroller and allows you to program and test it. You can use a dedicated programmer like the Atmel AVRISP mkII or simply use an Arduino board as a programmer.
To test your ATmega328P with a programmer, you will need to connect the programmer to your microcontroller, open up your preferred programming software, and flash a test program onto the microcontroller. Make sure to check for any errors or warnings during the programming process.
2. Using a Multimeter
Another method to test an ATmega328P microcontroller is by using a multimeter. A multimeter is a versatile tool that can measure various electrical properties, such as voltage, current, and resistance. You can use a multimeter to check if your microcontroller is getting power and if it is functioning properly.
To test your ATmega328P with a multimeter, simply set your multimeter to the appropriate settings for measuring voltage or resistance. Then, use the probes of the multimeter to check the power pins of the microcontroller to ensure that it is receiving power. You can also check the output pins of the microcontroller to verify that it is sending signals correctly.
3. Using Test Code
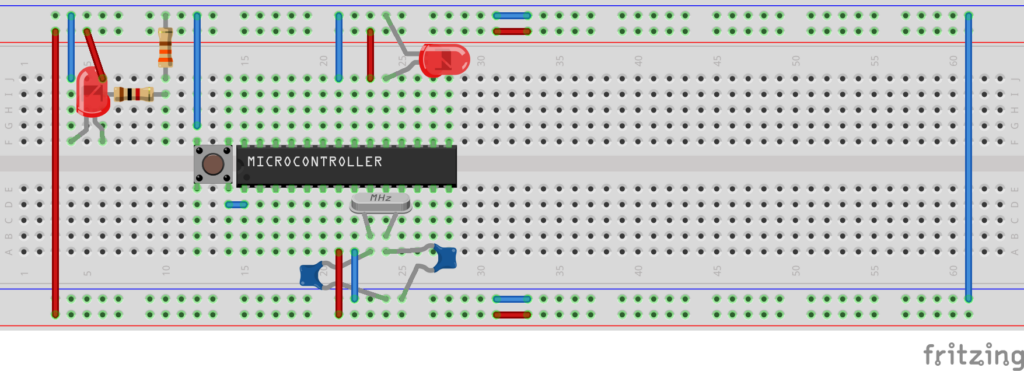
One of the best ways to test an ATmega328P microcontroller is by using test code. Test code is a simple program that you can upload to your microcontroller to check if it is functioning correctly. Test code usually includes basic functions like blinking an LED or serial communication.
To test your ATmega328P with test code, you will need to write a simple program using an integrated development environment (IDE) like Atmel Studio or the Arduino IDE. Upload the test code to your microcontroller and observe the results. If the LED blinks or you receive the expected serial output, then your microcontroller is working correctly.
4. Using an Oscilloscope
If you want to get more detailed information about the signals coming out of your ATmega328P microcontroller, you can use an oscilloscope. An oscilloscope is a tool that displays voltage signals as they change over time, allowing you to visualize the behavior of your microcontroller’s output signals.
To test your ATmega328P with an oscilloscope, simply connect the probe of the oscilloscope to the pins of the microcontroller that you want to monitor. You can then observe the waveform displayed on the oscilloscope screen to see if the signals are as expected.
By using these methods, you can effectively test your ATmega328P microcontroller and ensure that it is functioning correctly before incorporating it into your project. Taking the time to test your microcontroller can save you a lot of frustration later on and help you avoid any potential issues down the line.
How to Test an ATmega328P Microcontroller
Testing an ATmega328P microcontroller is an essential step to ensure that your project runs smoothly and without any hiccups. The ATmega328P is a popular microcontroller that is commonly used in many DIY electronics projects, such as Arduino.
There are several methods you can use to test an ATmega328P microcontroller to make sure it is working correctly. In this article, we will discuss some of the most common ways to test your ATmega328P microcontroller.
1. Using a Programmer
One of the most common ways to test an ATmega328P microcontroller is by using a programmer. A programmer is a hardware device that connects to your microcontroller and allows you to program and test it. You can use a dedicated programmer like the Atmel AVRISP mkII or simply use an Arduino board as a programmer.
To test your ATmega328P with a programmer, you will need to connect the programmer to your microcontroller, open up your preferred programming software, and flash a test program onto the microcontroller. Make sure to check for any errors or warnings during the programming process.
2. Using a Multimeter
Another method to test an ATmega328P microcontroller is by using a multimeter. A multimeter is a versatile tool that can measure various electrical properties, such as voltage, current, and resistance. You can use a multimeter to check if your microcontroller is getting power and if it is functioning properly.
To test your ATmega328P with a multimeter, simply set your multimeter to the appropriate settings for measuring voltage or resistance. Then, use the probes of the multimeter to check the power pins of the microcontroller to ensure that it is receiving power. You can also check the output pins of the microcontroller to verify that it is sending signals correctly.
3. Using Test Code
One of the best ways to test an ATmega328P microcontroller is by using test code. Test code is a simple program that you can upload to your microcontroller to check if it is functioning correctly. Test code usually includes basic functions like blinking an LED or serial communication.
To test your ATmega328P with test code, you will need to write a simple program using an integrated development environment (IDE) like Atmel Studio or the Arduino IDE. Upload the test code to your microcontroller and observe the results. If the LED blinks or you receive the expected serial output, then your microcontroller is working correctly.
4. Using an Oscilloscope
If you want to get more detailed information about the signals coming out of your ATmega328P microcontroller, you can use an oscilloscope. An oscilloscope is a tool that displays voltage signals as they change over time, allowing you to visualize the behavior of your microcontroller’s output signals.
To test your ATmega328P with an oscilloscope, simply connect the probe of the oscilloscope to the pins of the microcontroller that you want to monitor. You can then observe the waveform displayed on the oscilloscope screen to see if the signals are as expected.
By using these methods, you can effectively test your ATmega328P microcontroller and ensure that it is functioning correctly before incorporating it into your project. Taking the time to test your microcontroller can save you a lot of frustration later on and help you avoid any potential issues down the line.