How to Build a DIY RF Transmitter Circuit
Are you interested in building your own RF transmitter circuit? A radio frequency (RF) transmitter is a device that uses radio waves to send data wirelessly. It can be used for a variety of applications, such as remote control systems, wireless alarms, and even amateur radio. In this article, we will walk you through the steps to build a simple yet effective RF transmitter circuit using common electronic components.
Components Needed:
- 1 x Breadboard
- 1 x RF Transmitter Module
- 1 x Antenna
- 1 x Resistor (100 ohms)
- 1 x Capacitor (10 μF)
- 1 x Voltage Regulator (7805)
- 1 x LED
- Jumper Wires
- 9V Battery
Step 1: Setting Up the Breadboard
Start by placing the RF transmitter module in the center of the breadboard. Connect the antenna to the ANT pin on the module. Insert the LED into the breadboard, making sure the longer leg is connected to the positive rail and the shorter leg is connected to the transmitter module.
Step 2: Adding the Resistor and Capacitor
Connect the 100-ohm resistor between the VCC pin on the transmitter module and the positive rail on the breadboard. Attach the 10 μF capacitor between the GND pin on the module and the negative rail.
Step 3: Regulating the Voltage
Insert the 7805 voltage regulator on the breadboard. Connect the input pin to the positive rail and the output pin to the VCC pin on the transmitter module. Make sure to add the necessary capacitors for filtering.
Step 4: Powering Up the Circuit
Connect the 9V battery to the breadboard, ensuring the positive terminal is connected to the input pin of the voltage regulator and the negative terminal is connected to the ground rail. The LED should light up, indicating that the circuit is powered.
Step 5: Testing the RF Transmitter
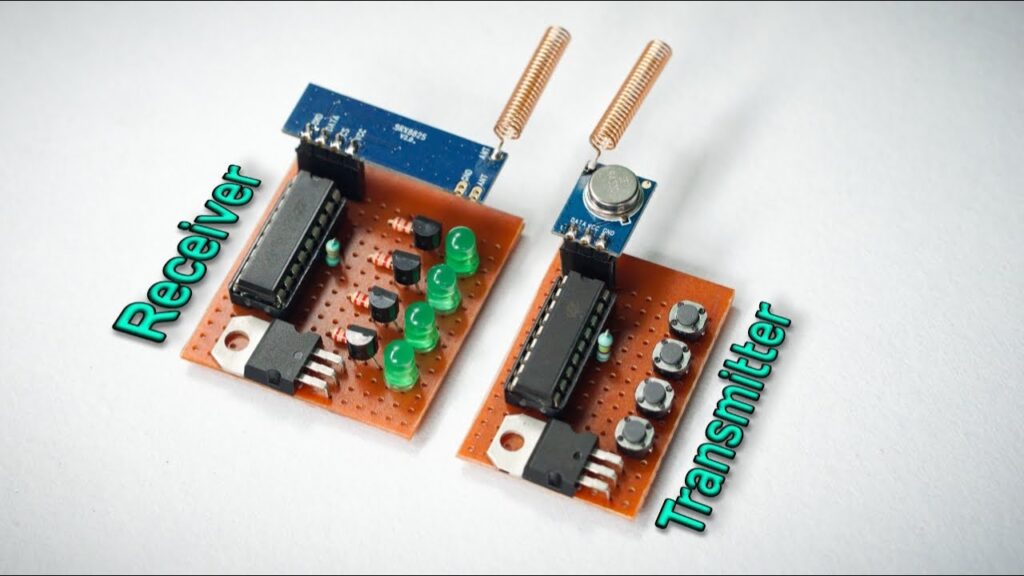
Now that the circuit is set up, you can test the RF transmitter by sending signals wirelessly. Use a receiver module to capture the transmitted data and verify that the circuit is functioning correctly.
Conclusion
Congratulations! You have successfully built a DIY RF transmitter circuit. Feel free to experiment with different components and configurations to customize the circuit for your specific needs. As always, remember to follow safety precautions when working with electronic circuits.
Thank you for reading. Happy tinkering!
How to Build a DIY RF Transmitter Circuit
Are you interested in building your own RF transmitter circuit? A radio frequency (RF) transmitter is a device that uses radio waves to send data wirelessly. It can be used for a variety of applications, such as remote control systems, wireless alarms, and even amateur radio. In this article, we will walk you through the steps to build a simple yet effective RF transmitter circuit using common electronic components.
Components Needed:
- 1 x Breadboard
- 1 x RF Transmitter Module
- 1 x Antenna
- 1 x Resistor (100 ohms)
- 1 x Capacitor (10 μF)
- 1 x Voltage Regulator (7805)
- 1 x LED
- Jumper Wires
- 9V Battery
Step 1: Setting Up the Breadboard
Start by placing the RF transmitter module in the center of the breadboard. Connect the antenna to the ANT pin on the module. Insert the LED into the breadboard, making sure the longer leg is connected to the positive rail and the shorter leg is connected to the transmitter module.
Step 2: Adding the Resistor and Capacitor
Connect the 100-ohm resistor between the VCC pin on the transmitter module and the positive rail on the breadboard. Attach the 10 μF capacitor between the GND pin on the module and the negative rail.
Step 3: Regulating the Voltage
Insert the 7805 voltage regulator on the breadboard. Connect the input pin to the positive rail and the output pin to the VCC pin on the transmitter module. Make sure to add the necessary capacitors for filtering.
Step 4: Powering Up the Circuit
Connect the 9V battery to the breadboard, ensuring the positive terminal is connected to the input pin of the voltage regulator and the negative terminal is connected to the ground rail. The LED should light up, indicating that the circuit is powered.
Step 5: Testing the RF Transmitter
Now that the circuit is set up, you can test the RF transmitter by sending signals wirelessly. Use a receiver module to capture the transmitted data and verify that the circuit is functioning correctly.
Conclusion
Congratulations! You have successfully built a DIY RF transmitter circuit. Feel free to experiment with different components and configurations to customize the circuit for your specific needs. As always, remember to follow safety precautions when working with electronic circuits.
Thank you for reading. Happy tinkering!