How to Create a Digital Clock Circuit
Are you interested in creating your own digital clock circuit? This project can be a fun and challenging way to dive into the world of electronics and learn more about how circuits work. In this article, we will guide you through the steps to create a digital clock circuit from scratch. So, grab your tools and let’s get started!
Materials Needed
- Breadboard
- Microcontroller (such as Arduino or Raspberry Pi)
- Real-time clock module (RTC)
- 7-segment LED display
- Resistors
- Jumper wires
- Power supply
- Soldering iron (optional)
Step 1: Set up the Breadboard
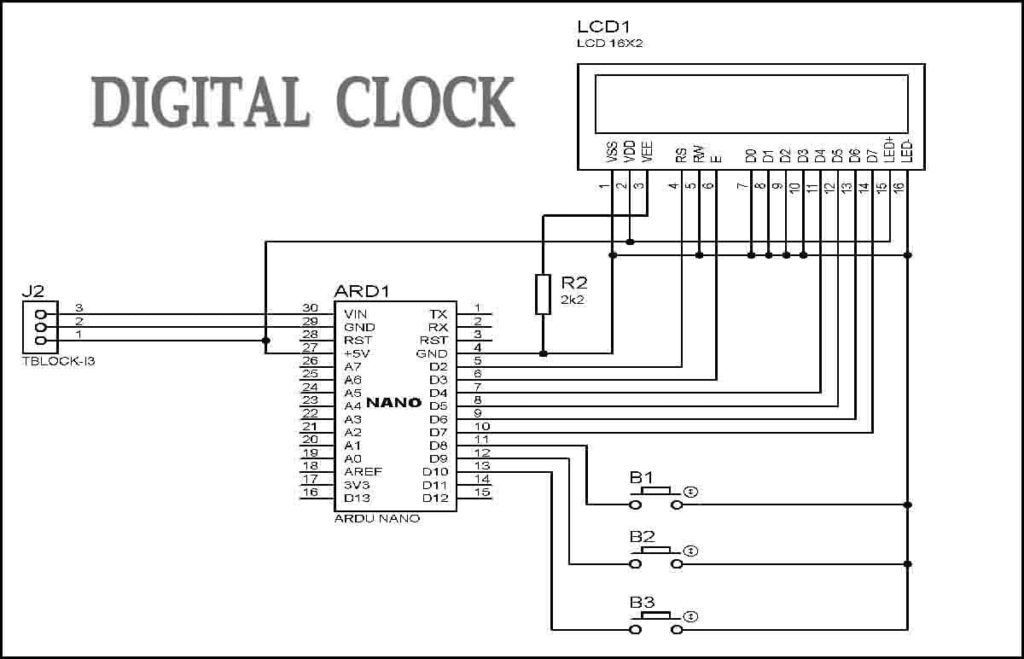
Start by placing the microcontroller, RTC module, and 7-segment LED display on the breadboard. Make sure to connect the components using jumper wires, following the wiring diagram for your specific microcontroller and RTC module. If you are using an Arduino, you can find plenty of tutorials online to help you with the wiring.
Step 2: Program the Microcontroller
Next, you will need to program the microcontroller to interface with the RTC module and control the 7-segment LED display. You can use Arduino IDE or other programming software to write the code. The code will include functions to read the current time from the RTC module and display it on the LED display.
Step 3: Connect the Components
Once you have written the code, upload it to the microcontroller and connect the components as per your wiring diagram. Ensure that all connections are secure and that there are no loose wires. You may need to use a soldering iron to make permanent connections, depending on your setup.
Step 4: Test the Circuit
After connecting all the components, power up the circuit and test if the digital clock displays the correct time. If you encounter any issues, double-check your wiring and code for errors. Troubleshooting is a crucial part of creating electronics projects, so don’t get discouraged if something doesn’t work on the first try.
Step 5: Customize Your Clock
Once your digital clock circuit is up and running, you can customize it further by adding features like alarms, temperature display, or different time formats. The possibilities are endless, so feel free to experiment and make the clock truly your own.
Creating a digital clock circuit is a rewarding project that will test your skills in electronics and programming. With patience and persistence, you can build a functional and personalized clock that will impress your friends and family. So, roll up your sleeves and get ready to embark on this exciting journey into the world of DIY electronics!
How to Create a Digital Clock Circuit
Are you interested in creating your own digital clock circuit? This project can be a fun and challenging way to dive into the world of electronics and learn more about how circuits work. In this article, we will guide you through the steps to create a digital clock circuit from scratch. So, grab your tools and let’s get started!
Materials Needed
- Breadboard
- Microcontroller (such as Arduino or Raspberry Pi)
- Real-time clock module (RTC)
- 7-segment LED display
- Resistors
- Jumper wires
- Power supply
- Soldering iron (optional)
Step 1: Set up the Breadboard
Start by placing the microcontroller, RTC module, and 7-segment LED display on the breadboard. Make sure to connect the components using jumper wires, following the wiring diagram for your specific microcontroller and RTC module. If you are using an Arduino, you can find plenty of tutorials online to help you with the wiring.
Step 2: Program the Microcontroller
Next, you will need to program the microcontroller to interface with the RTC module and control the 7-segment LED display. You can use Arduino IDE or other programming software to write the code. The code will include functions to read the current time from the RTC module and display it on the LED display.
Step 3: Connect the Components
Once you have written the code, upload it to the microcontroller and connect the components as per your wiring diagram. Ensure that all connections are secure and that there are no loose wires. You may need to use a soldering iron to make permanent connections, depending on your setup.
Step 4: Test the Circuit
After connecting all the components, power up the circuit and test if the digital clock displays the correct time. If you encounter any issues, double-check your wiring and code for errors. Troubleshooting is a crucial part of creating electronics projects, so don’t get discouraged if something doesn’t work on the first try.
Step 5: Customize Your Clock
Once your digital clock circuit is up and running, you can customize it further by adding features like alarms, temperature display, or different time formats. The possibilities are endless, so feel free to experiment and make the clock truly your own.
Creating a digital clock circuit is a rewarding project that will test your skills in electronics and programming. With patience and persistence, you can build a functional and personalized clock that will impress your friends and family. So, roll up your sleeves and get ready to embark on this exciting journey into the world of DIY electronics!