3. Write Your First Sketch
In Arduino lingo, a sketch is a piece of code that will run on your Arduino board. Start by writing a simple sketch to blink an LED connected to pin 13 of your Arduino board. Don’t worry if you’re not familiar with coding – Arduino’s syntax is beginner-friendly and easy to learn.
Once you have written your sketch, click the Upload button in the Arduino IDE to upload it to your board. You should see the LED blinking on and off, indicating that your code is running successfully.
4. Experiment with Sensors and Actuators
Now that you’ve mastered the basics, it’s time to experiment with sensors and actuators. Sensors can detect physical properties like light, temperature, and humidity, while actuators can control physical elements like motors and servos.
Connect a sensor or actuator to your Arduino board and write a sketch to interact with it. For example, you could create a temperature sensor that turns on a fan when the temperature exceeds a certain threshold.
5. Join the Arduino Community
One of the best ways to learn and grow as an Arduino enthusiast is to join the Arduino community. There are forums, online tutorials, and meetups where you can connect with other makers, ask for help, and share your projects. The Arduino community is welcoming and supportive, so don’t be afraid to reach out!
With these tips, you are now well on your way to mastering the world of Arduino. Remember to have fun, experiment, and don’t be afraid to make mistakes – that’s how you learn and grow as a maker!
How to Use an Arduino for Beginners
Arduino is a popular open-source platform used to develop electronics projects. Whether you’re a beginner or an experienced hobbyist, Arduino offers a user-friendly way to create interactive projects. In this guide, we will walk you through the basics of using an Arduino for beginners.
1. Understand the Basics
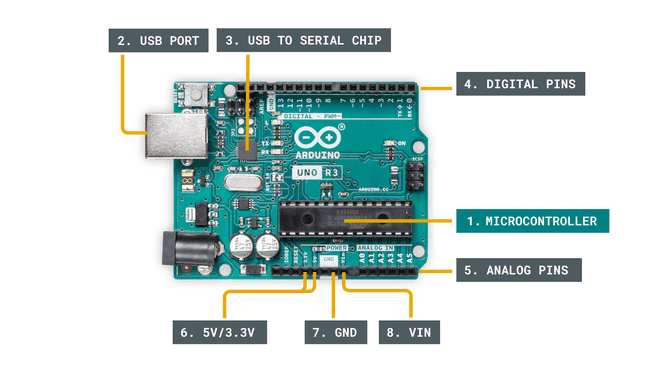
Before diving into using an Arduino, it’s important to understand the basics. Arduino is made up of two main components – the hardware (the physical board) and the software (the Arduino IDE). The hardware is the brain of your project, while the software is used to write, compile, and upload code to the board.
Arduino boards come in various shapes and sizes, but the most commonly used one is the Arduino Uno. It’s recommended for beginners due to its simplicity and versatility.
2. Set Up Your Arduino
Before you can start using your Arduino, you need to set it up. Begin by connecting your Arduino board to your computer using a USB cable. Make sure you have the Arduino IDE installed on your computer, which is available for free on the Arduino website.
Once you have the Arduino IDE installed, select the correct board and port in the Tools menu. You are now ready to start coding!
3. Write Your First Sketch
In Arduino lingo, a sketch is a piece of code that will run on your Arduino board. Start by writing a simple sketch to blink an LED connected to pin 13 of your Arduino board. Don’t worry if you’re not familiar with coding – Arduino’s syntax is beginner-friendly and easy to learn.
Once you have written your sketch, click the Upload button in the Arduino IDE to upload it to your board. You should see the LED blinking on and off, indicating that your code is running successfully.
4. Experiment with Sensors and Actuators
Now that you’ve mastered the basics, it’s time to experiment with sensors and actuators. Sensors can detect physical properties like light, temperature, and humidity, while actuators can control physical elements like motors and servos.
Connect a sensor or actuator to your Arduino board and write a sketch to interact with it. For example, you could create a temperature sensor that turns on a fan when the temperature exceeds a certain threshold.
5. Join the Arduino Community
One of the best ways to learn and grow as an Arduino enthusiast is to join the Arduino community. There are forums, online tutorials, and meetups where you can connect with other makers, ask for help, and share your projects. The Arduino community is welcoming and supportive, so don’t be afraid to reach out!
With these tips, you are now well on your way to mastering the world of Arduino. Remember to have fun, experiment, and don’t be afraid to make mistakes – that’s how you learn and grow as a maker!
Was this helpful?
0 / 0