How to Use a Diode Bridge
A diode bridge is a crucial component in electronics that allows current to flow in only one direction. It’s commonly used in power supplies and DC-to-DC converters to convert alternating current (AC) to direct current (DC). If you’re new to electronics or just need a refresher, this guide will walk you through how to effectively use a diode bridge.
1. Understand the Basics
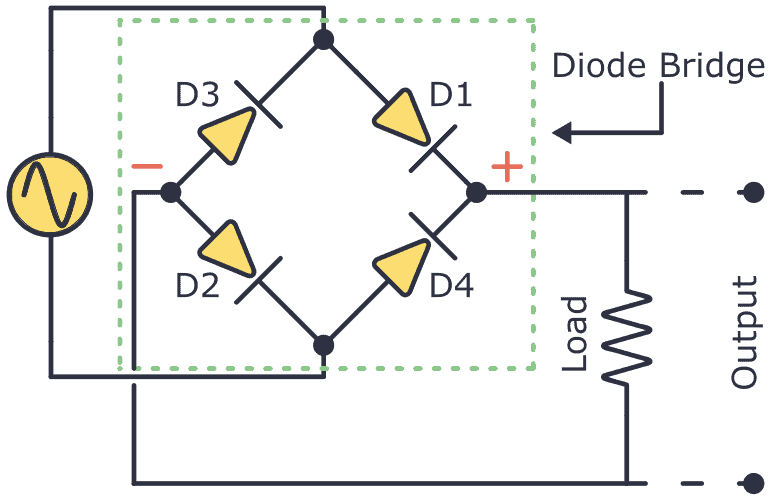
Before diving into using a diode bridge, it’s important to grasp its basic functionality. A diode is a semiconductor device that conducts current in one direction while blocking it in the opposite direction. A diode bridge is essentially four diodes connected together to form a circuit that allows current to flow in only one direction.
When an AC signal is applied to the input terminals of the diode bridge, the diodes’ arrangement ensures that the current only passes through in one direction, effectively converting the AC signal to a pulsating DC signal.
2. Identify the Input and Output Terminals
When using a diode bridge, it’s crucial to identify the input and output terminals. Typically, the AC input terminals are labeled as “+” and “-“, while the DC output terminals are labeled as “+” and “-“. Make sure to connect the AC signal to the input terminals and the load to the output terminals correctly to ensure proper functionality.
3. Connect the Diode Bridge to Your Circuit
Once you’ve identified the input and output terminals, it’s time to connect the diode bridge to your circuit. Ensure that the diode bridge is securely soldered in place and that the connections are tight to prevent any loose connections that could affect the flow of current.
Double-check your connections to ensure that the AC signal is properly connected to the input terminals and that the load is connected to the output terminals. Any incorrect connections could result in damage to the diode bridge or other components in your circuit.
4. Test the Circuit
Before applying power to your circuit, it’s essential to test the diode bridge to ensure that it’s functioning correctly. Use a multimeter to check the continuity of the diode bridge and verify that current flows in the correct direction.
If everything checks out, power up your circuit and observe the output. Make sure that the load receives the appropriate voltage and current without any fluctuations. If you notice any issues, double-check your connections and the diode bridge’s orientation to troubleshoot the problem.
5. Incorporate Necessary Safety Precautions
When working with electronics and diode bridges, it’s essential to incorporate necessary safety precautions to prevent accidents and damage. Always double-check your connections, avoid working on circuits with live power, and use insulated tools to prevent electric shocks.
Additionally, be mindful of the heat generated by the diode bridge during operation and ensure proper ventilation to prevent overheating. If you’re unsure about any aspect of using a diode bridge, do not hesitate to seek guidance from a knowledgeable individual or consult online resources for assistance.
6. Conclusion
Using a diode bridge can be intimidating for beginners, but with a clear understanding of its functionality and proper connection procedures, you can effectively incorporate it into your electronic circuits. Remember to test your circuit before applying power, incorporate safety precautions, and seek guidance if needed to ensure a successful outcome.
How to Use a Diode Bridge
A diode bridge is a crucial component in electronics that allows current to flow in only one direction. It’s commonly used in power supplies and DC-to-DC converters to convert alternating current (AC) to direct current (DC). If you’re new to electronics or just need a refresher, this guide will walk you through how to effectively use a diode bridge.
1. Understand the Basics
Before diving into using a diode bridge, it’s important to grasp its basic functionality. A diode is a semiconductor device that conducts current in one direction while blocking it in the opposite direction. A diode bridge is essentially four diodes connected together to form a circuit that allows current to flow in only one direction.
When an AC signal is applied to the input terminals of the diode bridge, the diodes’ arrangement ensures that the current only passes through in one direction, effectively converting the AC signal to a pulsating DC signal.
2. Identify the Input and Output Terminals
When using a diode bridge, it’s crucial to identify the input and output terminals. Typically, the AC input terminals are labeled as “+” and “-“, while the DC output terminals are labeled as “+” and “-“. Make sure to connect the AC signal to the input terminals and the load to the output terminals correctly to ensure proper functionality.
3. Connect the Diode Bridge to Your Circuit
Once you’ve identified the input and output terminals, it’s time to connect the diode bridge to your circuit. Ensure that the diode bridge is securely soldered in place and that the connections are tight to prevent any loose connections that could affect the flow of current.
Double-check your connections to ensure that the AC signal is properly connected to the input terminals and that the load is connected to the output terminals. Any incorrect connections could result in damage to the diode bridge or other components in your circuit.
4. Test the Circuit
Before applying power to your circuit, it’s essential to test the diode bridge to ensure that it’s functioning correctly. Use a multimeter to check the continuity of the diode bridge and verify that current flows in the correct direction.
If everything checks out, power up your circuit and observe the output. Make sure that the load receives the appropriate voltage and current without any fluctuations. If you notice any issues, double-check your connections and the diode bridge’s orientation to troubleshoot the problem.
5. Incorporate Necessary Safety Precautions
When working with electronics and diode bridges, it’s essential to incorporate necessary safety precautions to prevent accidents and damage. Always double-check your connections, avoid working on circuits with live power, and use insulated tools to prevent electric shocks.
Additionally, be mindful of the heat generated by the diode bridge during operation and ensure proper ventilation to prevent overheating. If you’re unsure about any aspect of using a diode bridge, do not hesitate to seek guidance from a knowledgeable individual or consult online resources for assistance.
6. Conclusion
Using a diode bridge can be intimidating for beginners, but with a clear understanding of its functionality and proper connection procedures, you can effectively incorporate it into your electronic circuits. Remember to test your circuit before applying power, incorporate safety precautions, and seek guidance if needed to ensure a successful outcome.