How to Build a Simple FM Transmitter
Are you interested in building your own FM transmitter? It’s easier than you think! In this guide, we will walk you through the steps to create a simple FM transmitter that you can use to broadcast music or messages in your local area. Let’s get started!
Step 1: Gather Your Materials
Before you begin building your FM transmitter, you’ll need to gather the necessary materials. Here’s what you’ll need:
- Breadboard
- Transistor
- Capacitors
- Resistors
- Antenna
- Battery
- Audio source (such as a smartphone or MP3 player)
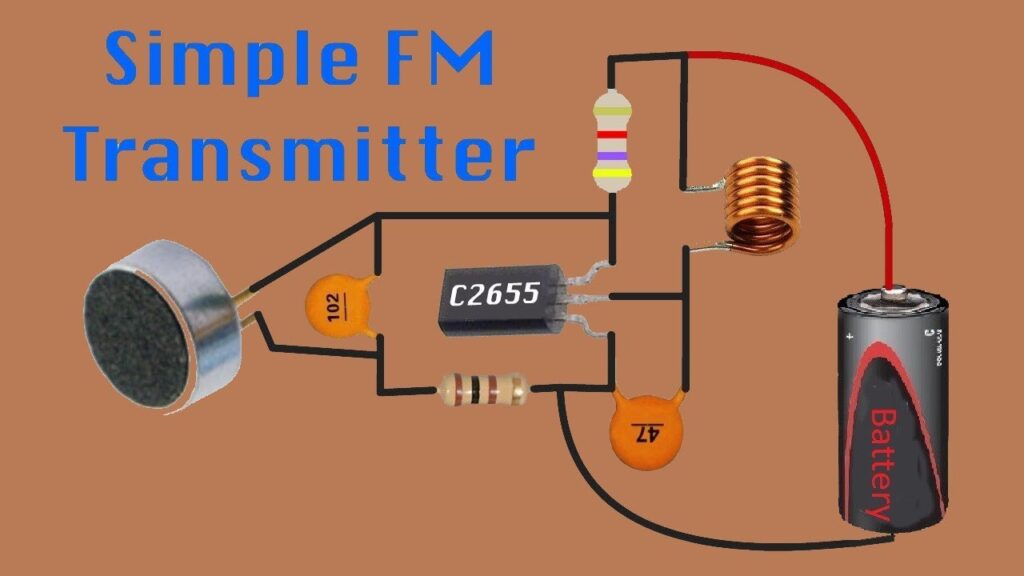
Step 2: Build the Circuit
Now that you have all of your materials, it’s time to start building the FM transmitter circuit. Follow these steps:
- Connect the transistor to the breadboard
- Connect the capacitors and resistors to the transistor
- Attach the antenna to the circuit
- Connect the audio source to the circuit
Step 3: Test Your FM Transmitter
Once you have finished building the circuit, it’s time to test your FM transmitter. Here’s what to do:
- Turn on your FM transmitter
- Tune your radio to an empty FM frequency
- Play some music on your audio source
- Listen for the music on your radio
Step 4: Fine-Tune Your FM Transmitter
If you’re not getting a clear signal on your radio, you may need to fine-tune your FM transmitter. Try adjusting the capacitors and resistors on the circuit until you get a clear signal.
Step 5: Broadcast Your Signal
Now that your FM transmitter is working properly, you can start broadcasting your music or messages to your local area. Just remember to follow any regulations or laws regarding broadcasting in your area.
And there you have it – a simple FM transmitter that you can build yourself! Have fun broadcasting and experimenting with your new creation.
How to Build a Simple FM Transmitter
Are you interested in building your own FM transmitter? It’s easier than you think! In this guide, we will walk you through the steps to create a simple FM transmitter that you can use to broadcast music or messages in your local area. Let’s get started!
Step 1: Gather Your Materials
Before you begin building your FM transmitter, you’ll need to gather the necessary materials. Here’s what you’ll need:
- Breadboard
- Transistor
- Capacitors
- Resistors
- Antenna
- Battery
- Audio source (such as a smartphone or MP3 player)
Step 2: Build the Circuit
Now that you have all of your materials, it’s time to start building the FM transmitter circuit. Follow these steps:
- Connect the transistor to the breadboard
- Connect the capacitors and resistors to the transistor
- Attach the antenna to the circuit
- Connect the audio source to the circuit
Step 3: Test Your FM Transmitter
Once you have finished building the circuit, it’s time to test your FM transmitter. Here’s what to do:
- Turn on your FM transmitter
- Tune your radio to an empty FM frequency
- Play some music on your audio source
- Listen for the music on your radio
Step 4: Fine-Tune Your FM Transmitter
If you’re not getting a clear signal on your radio, you may need to fine-tune your FM transmitter. Try adjusting the capacitors and resistors on the circuit until you get a clear signal.
Step 5: Broadcast Your Signal
Now that your FM transmitter is working properly, you can start broadcasting your music or messages to your local area. Just remember to follow any regulations or laws regarding broadcasting in your area.
And there you have it – a simple FM transmitter that you can build yourself! Have fun broadcasting and experimenting with your new creation.