How to Connect a Seven-Segment Display
A seven-segment display is a widely used electronic component that can display numbers, letters, and a few special characters. It consists of seven LED (Light Emitting Diode) segments arranged in a specific pattern that can be controlled to display different information. In this article, we will guide you on how to connect a seven-segment display to your circuit.
Step 1: Identify Pin Layout
Before connecting the seven-segment display to your circuit, it is essential to identify the pin layout of the display. Most seven-segment displays have two sets of pins – one set for the common cathode/anode and the other set for individual segment control. Refer to the datasheet of your display to understand the pin layout.
Step 2: Connect the Common Cathode/Anode
Next, you need to connect the common cathode/anode pin of the seven-segment display to the ground or VCC, depending on its type. This pin is shared among all the segments and is responsible for controlling the overall brightness of the display. Make sure to connect this pin correctly to avoid any damage to the display.
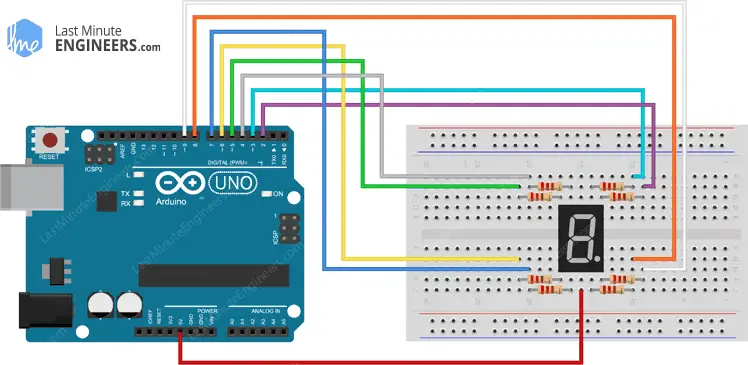
Step 3: Connect Individual Segment Control Pins
After connecting the common cathode/anode pin, you can proceed to connect the individual segment control pins of the display. These pins allow you to light up specific segments to display the desired information. Connect these pins to the output pins of your microcontroller or any other source of control signals.
Step 4: Add Current-Limiting Resistors
It is crucial to add current-limiting resistors to each segment control pin to prevent the display from drawing too much current. Calculate the appropriate resistor value based on the forward voltage and current rating of the LED segments. Connect these resistors in series with each segment control pin.
Step 5: Test the Display
Once you have connected all the necessary pins and resistors, it is time to test the display. Write a simple program in your microcontroller to display numbers or characters on the seven-segment display. Verify that each segment lights up correctly and adjust the connections if needed.
Step 6: Troubleshooting
If you encounter any issues during the testing phase, double-check your connections and resistor values. Make sure that all the pins are connected properly, and there are no short circuits or loose connections. Refer to the datasheet of the display for troubleshooting tips.
Conclusion
Connecting a seven-segment display may seem daunting at first, but with the right guidance and understanding of the pin layout, it can be a straightforward process. Follow the steps outlined in this article, and you will be able to integrate a seven-segment display into your circuits with ease. Have fun experimenting with different display patterns and characters!
Was this helpful?
0 / 0