How to Use a Logic Probe
A logic probe is a handy tool used by electronic technicians and hobbyists to troubleshoot digital circuits. It helps you determine the logic state (high or low) of a digital signal at a specific point in a circuit. This article will guide you on how to use a logic probe effectively.
Step 1: Familiarize Yourself with the Logic Probe
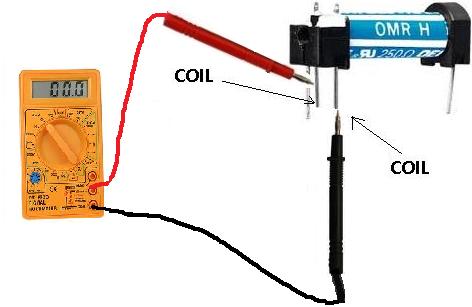
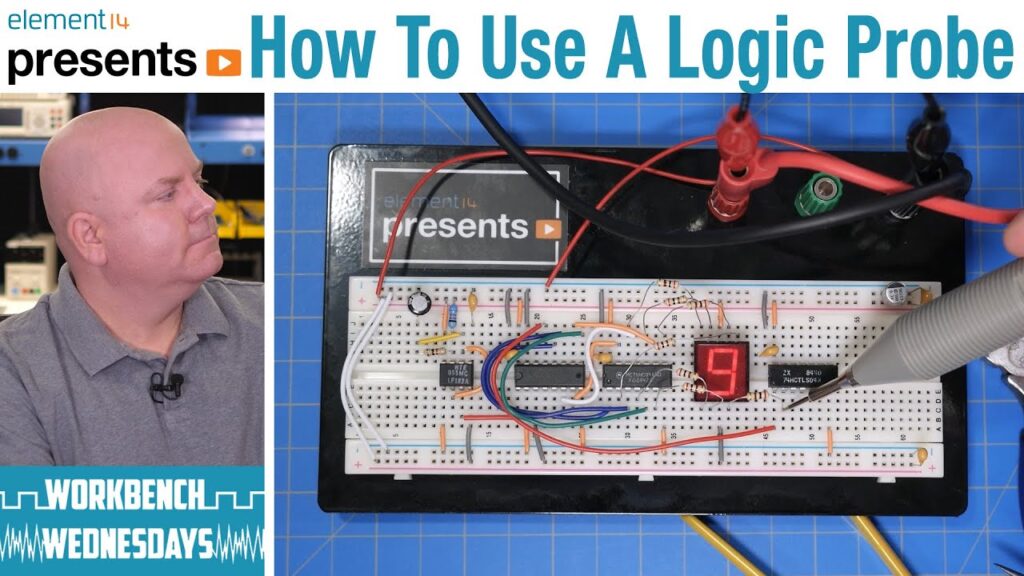
Before using a logic probe, it is essential to understand its components. A typical logic probe consists of a probe tip, indicator lights, and a ground clip. The indicator lights are usually labeled as HI, LO, and PULSE, indicating high, low, and pulse signals, respectively.
Ensure that the logic probe is properly calibrated and the batteries are charged before use. Familiarize yourself with the probe’s features and how to interpret the readings from the indicator lights.
Step 2: Connect the Logic Probe
To use a logic probe, connect the ground clip to the ground (often the black wire) of the digital circuit. Then, touch the probe tip to the signal you want to test. The indicator lights will light up to indicate the logic state of the signal.
If the HI indicator light lights up, it means the signal is high (voltage level close to the power supply voltage). If the LO indicator light lights up, it means the signal is low (voltage level close to ground). The PULSE indicator light may blink to indicate a pulse signal.
Step 3: Interpret the Readings
Once you have connected the logic probe, observe the indicator lights to determine the logic state of the signal. If the HI and LO lights both turn on, it indicates that the signal is oscillating between a high and low state.
If the PULSE light blinks, it means the signal is pulsing or changing rapidly. Use the logic probe to trace the signal through various components of the circuit to locate any issues, such as shorts or open circuits.
Step 4: Troubleshooting Tips
If the logic probe indicates a low signal when you expect a high signal, check for issues such as disconnected wires, faulty components, or incorrect logic levels in the circuit. Ensure that all connections are secure and that the components are functioning correctly.
Use the logic probe to trace the signal path in the circuit, starting from the input to the output. Look for any anomalies or unexpected readings that may indicate a problem. Take your time to troubleshoot the circuit systematically to identify and rectify any issues.
Conclusion
A logic probe is a valuable tool for diagnosing digital circuits quickly and effectively. By following the steps outlined in this article, you can use a logic probe to troubleshoot circuits with ease and precision. Remember to handle the probe with care and always observe proper safety precautions when working with electronic circuits.
How to Use a Logic Probe
A logic probe is a handy tool used by electronic technicians and hobbyists to troubleshoot digital circuits. It helps you determine the logic state (high or low) of a digital signal at a specific point in a circuit. This article will guide you on how to use a logic probe effectively.
Step 1: Familiarize Yourself with the Logic Probe
Before using a logic probe, it is essential to understand its components. A typical logic probe consists of a probe tip, indicator lights, and a ground clip. The indicator lights are usually labeled as HI, LO, and PULSE, indicating high, low, and pulse signals, respectively.
Ensure that the logic probe is properly calibrated and the batteries are charged before use. Familiarize yourself with the probe’s features and how to interpret the readings from the indicator lights.
Step 2: Connect the Logic Probe
To use a logic probe, connect the ground clip to the ground (often the black wire) of the digital circuit. Then, touch the probe tip to the signal you want to test. The indicator lights will light up to indicate the logic state of the signal.
If the HI indicator light lights up, it means the signal is high (voltage level close to the power supply voltage). If the LO indicator light lights up, it means the signal is low (voltage level close to ground). The PULSE indicator light may blink to indicate a pulse signal.
Step 3: Interpret the Readings
Once you have connected the logic probe, observe the indicator lights to determine the logic state of the signal. If the HI and LO lights both turn on, it indicates that the signal is oscillating between a high and low state.
If the PULSE light blinks, it means the signal is pulsing or changing rapidly. Use the logic probe to trace the signal through various components of the circuit to locate any issues, such as shorts or open circuits.
Step 4: Troubleshooting Tips
If the logic probe indicates a low signal when you expect a high signal, check for issues such as disconnected wires, faulty components, or incorrect logic levels in the circuit. Ensure that all connections are secure and that the components are functioning correctly.
Use the logic probe to trace the signal path in the circuit, starting from the input to the output. Look for any anomalies or unexpected readings that may indicate a problem. Take your time to troubleshoot the circuit systematically to identify and rectify any issues.
Conclusion
A logic probe is a valuable tool for diagnosing digital circuits quickly and effectively. By following the steps outlined in this article, you can use a logic probe to troubleshoot circuits with ease and precision. Remember to handle the probe with care and always observe proper safety precautions when working with electronic circuits.