How to Connect a Relay to an Arduino
Relays are crucial components in electronics that allow low-voltage signals to control high-voltage devices. Connecting a relay to an Arduino opens the door to a wide range of projects that involve controlling powerful devices such as motors, lights, and appliances. In this guide, we will walk you through the steps to effectively connect a relay to your Arduino.
First, let’s understand what a relay is and how it works. A relay is an electromagnetic switch that uses a small current to control a larger current. It consists of an electromagnet that, when energized, moves a set of contacts to make or break a circuit. This allows you to control high-power devices with the low-power signals from your Arduino.
Here’s a step-by-step guide to connecting a relay to your Arduino:
1. Choose the right relay: There are different types of relays available, such as electromagnetic relays and solid-state relays. Make sure you choose a relay that suits your project’s voltage and current requirements.
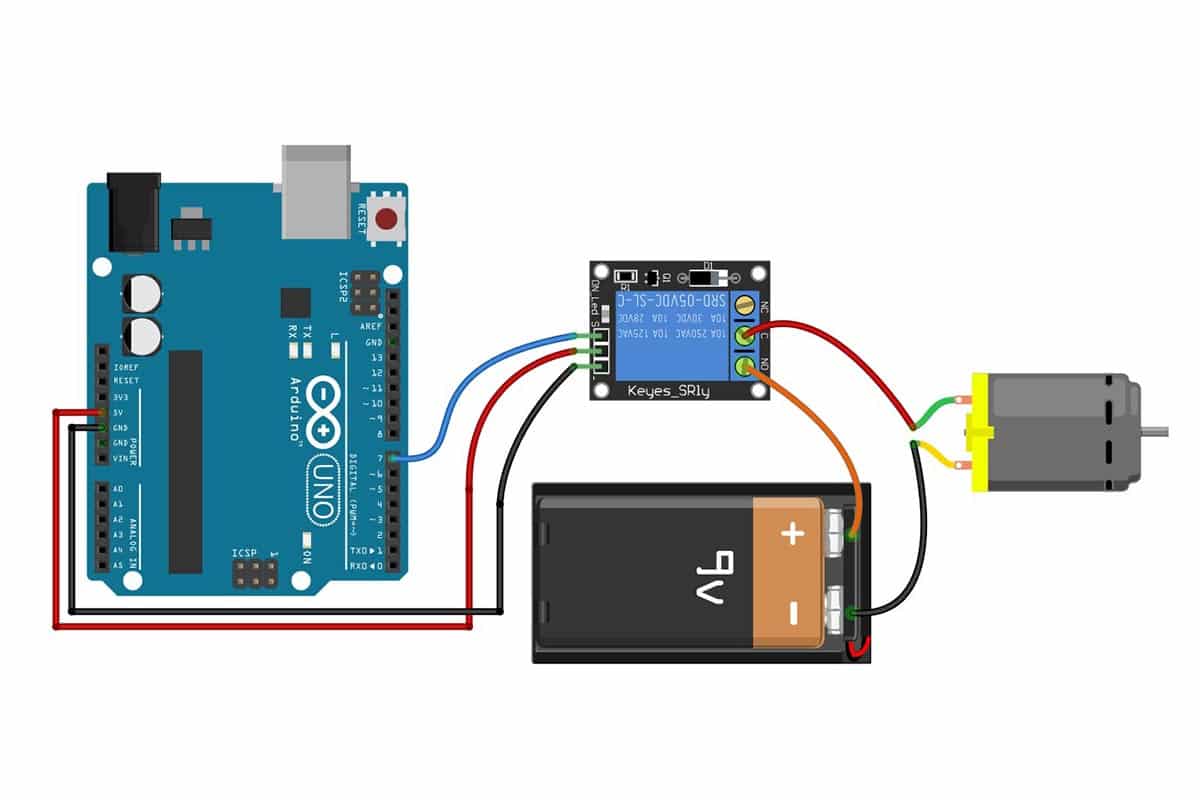
2. Connect the relay to your Arduino: To connect the relay to your Arduino, you will need to identify the relay’s control pins, typically labeled as “IN”, “GND”, and “VCC”. Connect the relay’s “IN” pin to a digital output pin on your Arduino, the “GND” pin to the ground pin on your Arduino, and the “VCC” pin to a 5V power source on your Arduino.
3. Connect the high-power device: Once the relay is connected to your Arduino, you can now connect the high-power device you want to control to the relay’s “NO” (Normally Open) and “COM” (Common) pins. When the relay is activated, the circuit between these pins will close, allowing current to flow to your device.
4. Write the Arduino code: Now that everything is connected, you need to write the Arduino code to control the relay. You can use the Arduino IDE to program the Arduino board to send signals to the relay based on your project’s requirements. For example, you can turn the relay on and off using digitalWrite commands.
5. Test the connection: Before fully implementing your project, it is essential to test the connection between the relay and the Arduino. Make sure the high-power device turns on and off as expected when you activate the relay.
With these steps, you can effectively connect a relay to your Arduino and start controlling high-power devices in your projects. Remember to always follow proper safety precautions when working with high-voltage devices and consult datasheets for your relay and Arduino board for specific wiring instructions.
Relays are versatile components that can add functionality and automation to your Arduino projects. Whether you’re building a home automation system, a robotics project, or a smart device, knowing how to connect a relay to your Arduino will open up new possibilities for creative projects. Have fun exploring the possibilities of relay-controlled devices with your Arduino!
Was this helpful?
0 / 0