How to Wire a Push Button Switch
Push button switches are commonly used in various electrical circuits, from simple applications like turning on a light to more complex systems in industrial machinery. Wiring a push button switch is a relatively simple process, but it’s essential to do it correctly to ensure the switch functions properly and safely. In this article, we will guide you through the steps on how to wire a push button switch effectively.
Materials Needed:
- Push button switch
- Wire cutter/stripper
- Screwdriver
- Electrical tape or wire connectors
- Power source
- Device to be controlled (e.g., light, motor)
Step 1: Understand the Push Button Switch
Before you start wiring the push button switch, it’s crucial to understand its components. A typical push button switch consists of two main parts: the actuator (the button you press) and the body (housing the contacts). The switch can be normally open (NO) or normally closed (NC), depending on its configuration.
A NO push button switch only makes contact and completes the circuit when the button is pressed, while an NC push button switch maintains contact and completes the circuit when the button is not pressed. Make sure you identify which type of switch you are working with before proceeding.
Step 2: Prepare the Wires
Cut two pieces of wire to connect the push button switch to the power source and the device to be controlled. Use the wire cutter/stripper to strip the insulation off the ends of the wires, exposing a small portion of the conductor. This will allow you to make secure connections to the switch terminals.
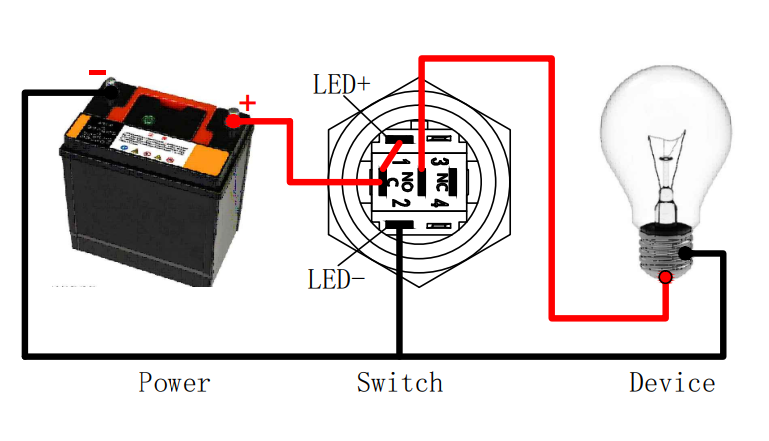
Step 3: Connect the Power Source
Identify the terminals on the push button switch labeled “power source” or “input”. Connect one end of the wire from the power source to one of these terminals, securing it in place using a screwdriver. Repeat this process for the second wire from the power source to the other terminal.
Step 4: Connect the Device to be Controlled
Next, locate the terminals on the push button switch labeled “load” or “output”. Connect one end of the wire from the device to be controlled to one of these terminals, ensuring a secure connection. Repeat the process for the second wire from the device to be controlled to the other terminal.
Step 5: Test the Connection
After all the wires are securely connected to the push button switch, it’s time to test the circuit. Press the button on the switch to see if the device being controlled turns on/off as expected. If the device responds appropriately, then congratulations – you have successfully wired a push button switch!
Final Thoughts
Wiring a push button switch is a fundamental skill in the world of electronics. By following these steps and understanding the components of the switch, you can easily wire a push button switch for your next project. Remember to always double-check your connections and ensure that the circuit is properly insulated to prevent any electrical hazards. Happy wiring!
How to Wire a Push Button Switch
Push button switches are commonly used in various electrical circuits, from simple applications like turning on a light to more complex systems in industrial machinery. Wiring a push button switch is a relatively simple process, but it’s essential to do it correctly to ensure the switch functions properly and safely. In this article, we will guide you through the steps on how to wire a push button switch effectively.
Materials Needed:
- Push button switch
- Wire cutter/stripper
- Screwdriver
- Electrical tape or wire connectors
- Power source
- Device to be controlled (e.g., light, motor)
Step 1: Understand the Push Button Switch
Before you start wiring the push button switch, it’s crucial to understand its components. A typical push button switch consists of two main parts: the actuator (the button you press) and the body (housing the contacts). The switch can be normally open (NO) or normally closed (NC), depending on its configuration.
A NO push button switch only makes contact and completes the circuit when the button is pressed, while an NC push button switch maintains contact and completes the circuit when the button is not pressed. Make sure you identify which type of switch you are working with before proceeding.
Step 2: Prepare the Wires
Cut two pieces of wire to connect the push button switch to the power source and the device to be controlled. Use the wire cutter/stripper to strip the insulation off the ends of the wires, exposing a small portion of the conductor. This will allow you to make secure connections to the switch terminals.
Step 3: Connect the Power Source
Identify the terminals on the push button switch labeled “power source” or “input”. Connect one end of the wire from the power source to one of these terminals, securing it in place using a screwdriver. Repeat this process for the second wire from the power source to the other terminal.
Step 4: Connect the Device to be Controlled
Next, locate the terminals on the push button switch labeled “load” or “output”. Connect one end of the wire from the device to be controlled to one of these terminals, ensuring a secure connection. Repeat the process for the second wire from the device to be controlled to the other terminal.
Step 5: Test the Connection
After all the wires are securely connected to the push button switch, it’s time to test the circuit. Press the button on the switch to see if the device being controlled turns on/off as expected. If the device responds appropriately, then congratulations – you have successfully wired a push button switch!
Final Thoughts
Wiring a push button switch is a fundamental skill in the world of electronics. By following these steps and understanding the components of the switch, you can easily wire a push button switch for your next project. Remember to always double-check your connections and ensure that the circuit is properly insulated to prevent any electrical hazards. Happy wiring!