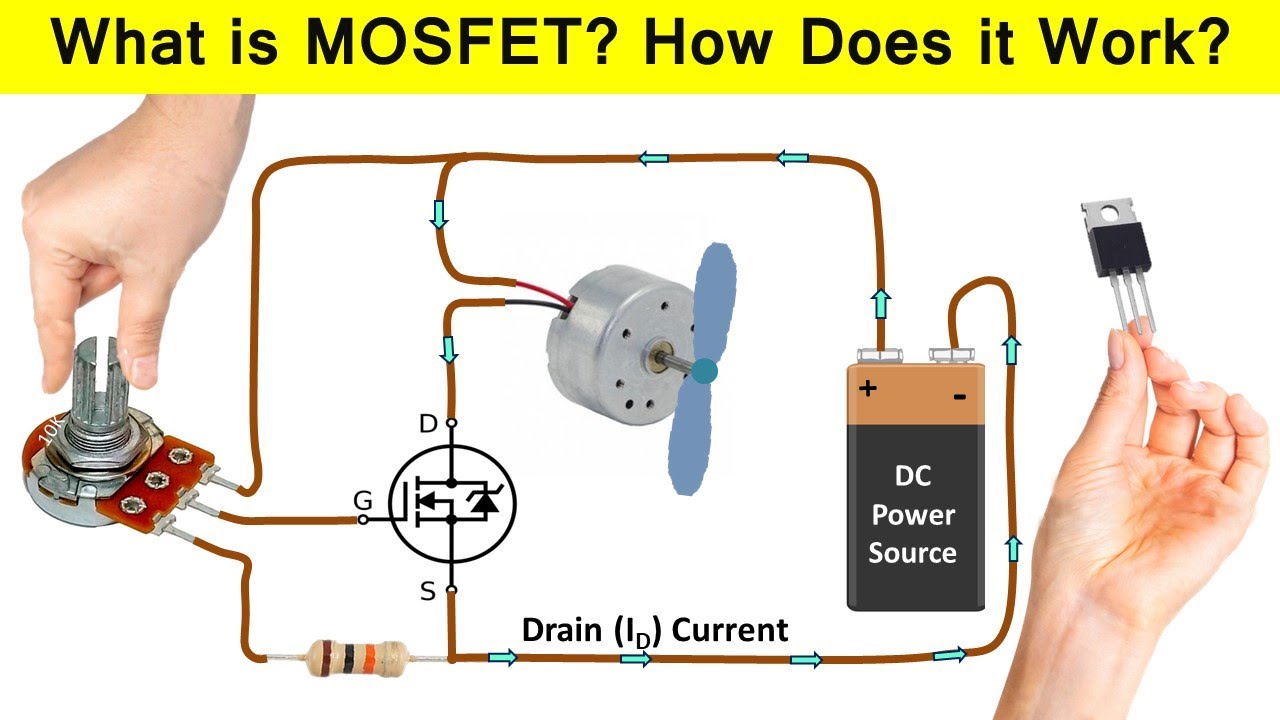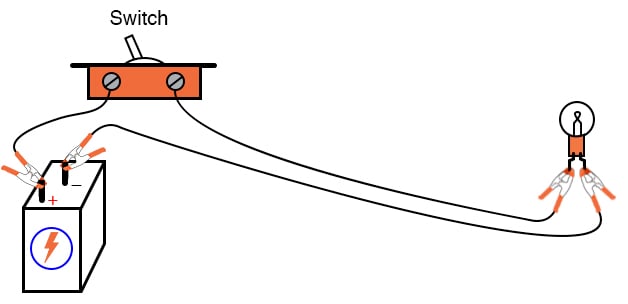
How to connect a switch to a circuit?
Connecting a switch to a circuit is a simple but crucial task in electronics. Whether you are a hobbyist or a professional, knowing how to properly connect a switch can make your projects run smoothly. In this guide, we will go over the steps you need to follow to connect a switch to a circuit.
Step 1: Gather the necessary materials
Before you start connecting the switch to the circuit, make sure you have all the necessary materials. You will need:
- A switch
- A circuit board
- Wires
- Soldering iron and solder
- Wire cutter/stripper
- Multimeter (optional, for testing)
Step 2: Determine the type of switch
There are different types of switches available, such as toggle switches, push-button switches, rocker switches, and more. Depending on your project requirements, choose the type of switch you want to use.
Step 3: Mount the switch on the circuit board
Once you have selected the switch, it’s time to mount it on the circuit board. Follow the manufacturer’s instructions on how to correctly place the switch on the board.
Step 4: Connect the wires
Using a wire cutter/stripper, cut the wires to the desired length. Strip off a small portion of the insulation from the wire ends. Then, solder the wires to the terminals on the switch and the circuit board. Make sure the connections are secure and not loose.
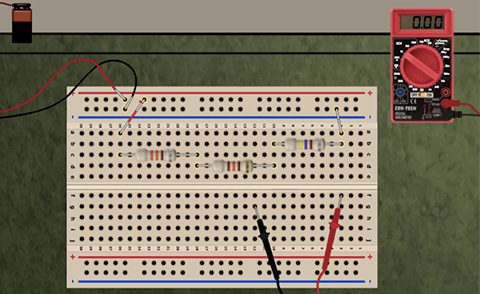
Step 5: Test the switch
Before closing up the circuit, it’s important to test the switch to ensure it is working correctly. Use a multimeter to check for continuity when the switch is in different positions. Make any necessary adjustments if the switch is not working as expected.
Step 6: Secure the connections
Once you have confirmed that the switch is working properly, secure the connections by applying some hot glue or insulating tape. This will prevent the wires from coming loose and causing a short circuit.
Step 7: Close up the circuit
After securing the connections, close up the circuit by placing the circuit board back into its enclosure. Make sure everything fits snugly and there are no loose parts that could cause a malfunction.
Step 8: Test the entire circuit
Once you have completed all the steps, it’s time to test the entire circuit. Power it up and check if the switch functions as intended. Make any final adjustments if needed.
Conclusion
Connecting a switch to a circuit is a fundamental skill in electronics. By following the steps outlined in this guide, you can confidently incorporate switches into your projects with ease. Remember to always double-check your connections and test the circuit before finalizing it.
How to connect a switch to a circuit?
Connecting a switch to a circuit is a simple but crucial task in electronics. Whether you are a hobbyist or a professional, knowing how to properly connect a switch can make your projects run smoothly. In this guide, we will go over the steps you need to follow to connect a switch to a circuit.
Step 1: Gather the necessary materials
Before you start connecting the switch to the circuit, make sure you have all the necessary materials. You will need:
- A switch
- A circuit board
- Wires
- Soldering iron and solder
- Wire cutter/stripper
- Multimeter (optional, for testing)
Step 2: Determine the type of switch
There are different types of switches available, such as toggle switches, push-button switches, rocker switches, and more. Depending on your project requirements, choose the type of switch you want to use.
Step 3: Mount the switch on the circuit board
Once you have selected the switch, it’s time to mount it on the circuit board. Follow the manufacturer’s instructions on how to correctly place the switch on the board.
Step 4: Connect the wires
Using a wire cutter/stripper, cut the wires to the desired length. Strip off a small portion of the insulation from the wire ends. Then, solder the wires to the terminals on the switch and the circuit board. Make sure the connections are secure and not loose.
Step 5: Test the switch
Before closing up the circuit, it’s important to test the switch to ensure it is working correctly. Use a multimeter to check for continuity when the switch is in different positions. Make any necessary adjustments if the switch is not working as expected.
Step 6: Secure the connections
Once you have confirmed that the switch is working properly, secure the connections by applying some hot glue or insulating tape. This will prevent the wires from coming loose and causing a short circuit.
Step 7: Close up the circuit
After securing the connections, close up the circuit by placing the circuit board back into its enclosure. Make sure everything fits snugly and there are no loose parts that could cause a malfunction.
Step 8: Test the entire circuit
Once you have completed all the steps, it’s time to test the entire circuit. Power it up and check if the switch functions as intended. Make any final adjustments if needed.
Conclusion
Connecting a switch to a circuit is a fundamental skill in electronics. By following the steps outlined in this guide, you can confidently incorporate switches into your projects with ease. Remember to always double-check your connections and test the circuit before finalizing it.