How to Make a Simple LED Circuit
LED circuits are a fun and simple way to learn about electronics and lighting. In this guide, we will show you how to create a basic LED circuit using just a few components.
Here’s what you’ll need:
- 1 LED (any color)
- 1 resistor (220 ohm recommended)
- 1 breadboard
- 2 jumper wires
- 1 battery (3V to 9V)
Step 1: Connect the LED to the Breadboard
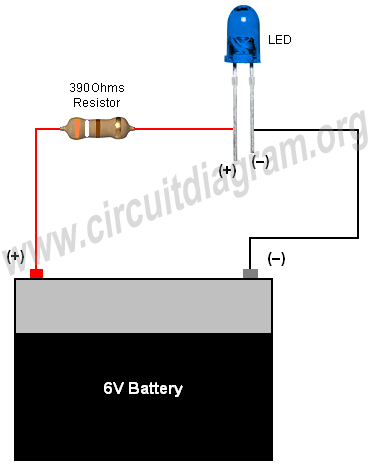
Start by placing the LED on the breadboard. LEDs have two legs – a longer leg (the anode) and a shorter leg (the cathode). The longer leg should be connected to the positive side of the breadboard, and the shorter leg should be connected to the negative side.
Step 2: Add the Resistor
Insert the resistor into the breadboard, connecting one end to the positive side and the other end to the negative side. The resistor helps limit the amount of current flowing through the LED, preventing it from burning out.
Step 3: Connect the Battery
Take one jumper wire and connect it from the positive side of the breadboard to the positive terminal of the battery. Then, take another jumper wire and connect it from the negative side of the breadboard to the negative terminal of the battery.
Step 4: Test the Circuit
Once everything is connected, the LED should light up. If it doesn’t, double-check your connections and make sure everything is securely in place.
And there you have it – a simple LED circuit! Play around with different colors of LEDs and resistors to create unique lighting effects. Happy experimenting!
Remember to always handle electronic components with care and caution, especially when working with batteries.
How to Make a Simple LED Circuit
LED circuits are a fun and simple way to learn about electronics and lighting. In this guide, we will show you how to create a basic LED circuit using just a few components.
Here’s what you’ll need:
- 1 LED (any color)
- 1 resistor (220 ohm recommended)
- 1 breadboard
- 2 jumper wires
- 1 battery (3V to 9V)
Step 1: Connect the LED to the Breadboard
Start by placing the LED on the breadboard. LEDs have two legs – a longer leg (the anode) and a shorter leg (the cathode). The longer leg should be connected to the positive side of the breadboard, and the shorter leg should be connected to the negative side.
Step 2: Add the Resistor
Insert the resistor into the breadboard, connecting one end to the positive side and the other end to the negative side. The resistor helps limit the amount of current flowing through the LED, preventing it from burning out.
Step 3: Connect the Battery
Take one jumper wire and connect it from the positive side of the breadboard to the positive terminal of the battery. Then, take another jumper wire and connect it from the negative side of the breadboard to the negative terminal of the battery.
Step 4: Test the Circuit
Once everything is connected, the LED should light up. If it doesn’t, double-check your connections and make sure everything is securely in place.
And there you have it – a simple LED circuit! Play around with different colors of LEDs and resistors to create unique lighting effects. Happy experimenting!
Remember to always handle electronic components with care and caution, especially when working with batteries.